1.纯POI操作Excel
添加依赖
        <dependency>
            <groupId>org.apache.poi</groupId>
            <artifactId>poi</artifactId>
            <version>4.0.1</version>
        </dependency>

        <dependency>
            <groupId>org.apache.poi</groupId>
            <artifactId>poi-ooxml</artifactId>
            <version>4.0.1</version>
        </dependency>

        <dependency>
            <groupId>org.apache.poi</groupId>
            <artifactId>poi-ooxml-schemas</artifactId>
            <version>4.0.1</version>
        </dependency>
1.1 POI操作Excel
在POI包中有如下几个主要对象和Excel的几个对象对应:
| 对应Excel名称 | 类名 |
|---|---|
| 工作簿 | XSSFWorkbook |
| 工作表 | XSSFSheet |
| 行 | XSSFRow |
| 单元格 | XSSFCell |
| 单元格样式 | XSSFCellStyle |
入门案例代码:创建一个新的工作簿,里面随便写一句话
操作代码:
创建一个低版本的excel,并且向其中的一个单元格中随便写一句话
package com.muziwk.test;

import org.apache.poi.hssf.usermodel.HSSFWorkbook;
import org.apache.poi.ss.usermodel.Cell;
import org.apache.poi.ss.usermodel.Row;
import org.apache.poi.ss.usermodel.Sheet;
import org.apache.poi.ss.usermodel.Workbook;

import java.io.FileOutputStream;

//创建一个低版本的excel,并且向其中的一个单元格中随便写一句话
public class POIDemo1 {

    public static void main(String[] args) throws Exception {
        //创建一个全新工作薄
        Workbook workbook = new HSSFWorkbook();
        //在工作薄中创建新的工作表
        Sheet sheet = workbook.createSheet("POI操作Excel");
        //在工作表中创建行
        Row row = sheet.createRow(0);
        //在行中创建单元格
        Cell cell = row.createCell(0);
        //在单元格中写入内容
        cell.setCellValue("这是我第一次玩POI");
        workbook.write(new FileOutputStream("d:/test.xls"));
    }
}
创建一个高版本的excel,并且向其中的一个单元格中随便写一句话
package com.muziwk.test;

import org.apache.poi.hssf.usermodel.HSSFWorkbook;
import org.apache.poi.ss.usermodel.Cell;
import org.apache.poi.ss.usermodel.Row;
import org.apache.poi.ss.usermodel.Sheet;
import org.apache.poi.ss.usermodel.Workbook;
import org.apache.poi.xssf.usermodel.XSSFWorkbook;

import java.io.FileOutputStream;

//创建一个高版本的excel,并且向其中的一个单元格中随便写一句话
public class POIDemo2 {

    public static void main(String[] args) throws Exception {
        // 创建一个全新工作薄
        Workbook workbook = new XSSFWorkbook();
        //在工作薄中创建新的工作表
        Sheet sheet = workbook.createSheet("POI操作Excel");
        //在工作表中创建行
        Row row = sheet.createRow(0);
        //在行中创建单元格
        Cell cell = row.createCell(0);
        //在单元格中写入内容
        cell.setCellValue("这是我第一次玩POI");

        workbook.write(new FileOutputStream("d:/test.xlsx"));

    }
}
读取一个excel中的内容
package com.muziwk.test;

import org.apache.poi.ss.usermodel.Row;
import org.apache.poi.ss.usermodel.Sheet;
import org.apache.poi.ss.usermodel.Workbook;
import org.apache.poi.xssf.usermodel.XSSFWorkbook;

import com.muziwk.pojo.User;

import java.io.FileInputStream;
import java.text.SimpleDateFormat;
import java.util.Date;

//读取一个excel中的内容
public class POIDemo3 {

    public static void main(String[] args) throws Exception {
		//用户名	手机号	省份	城市	工资	入职日期	出生日期	现住地址
        SimpleDateFormat simpleDateFormat = new SimpleDateFormat("yyyy-MM-dd");

        //有内容的workbook工作薄
        Workbook workbook = new XSSFWorkbook(new FileInputStream("D://用户导入测试数据.xlsx"));
        //获取到第一个工作表
        Sheet sheet = workbook.getSheetAt(0);
		//当前sheet的最后一行的索引值
        int lastRowIndex = sheet.getLastRowNum();
        //读取工作表中的内容
        Row row = null;
        User user = null;
        for (int i = 1; i <= lastRowIndex; i++) {
            row = sheet.getRow(i);
            //用户名	手机号	省份	城市	工资	入职日期	出生日期	现住地址
            String userName = row.getCell(0).getStringCellValue(); //用户名
            String phone = null; //手机号
            try {
                phone = row.getCell(1).getStringCellValue();
            } catch (Exception e) {
                phone = row.getCell(1).getNumericCellValue()+"";
            }
            String province = row.getCell(2).getStringCellValue(); //省份
            String city = row.getCell(3).getStringCellValue(); //城市
            Integer salary =( (Double)row.getCell(4).getNumericCellValue()).intValue(); //工资
            Date hireDate = simpleDateFormat.parse(row.getCell(5).getStringCellValue()) ; //入职日期
            Date birthDay = simpleDateFormat.parse(row.getCell(6).getStringCellValue()) ; //出生日期
            String address = row.getCell(7).getStringCellValue(); //现住地址

            System.out.println(userName+":"+phone+":"+province+":"+city+":"+salary+":"+hireDate+":"+birthDay+":"+address);
            user.setUserName(userName);
            user.setPhone(phone);
            user.setProvince(province);
            user.setCity(city);
            user.setSalary(salary);
            user.setHireDate(hireDate);
            user.setBirthday(birthDay);
            user.setAddress(address);
//            执行插入user方法
        }
    }
}
导出一个有样式的excel
package com.muziwk.test;

import org.apache.poi.ss.usermodel.*;
import org.apache.poi.ss.util.CellRangeAddress;
import org.apache.poi.xssf.usermodel.XSSFCellStyle;
import org.apache.poi.xssf.usermodel.XSSFWorkbook;

import java.io.FileOutputStream;

//导出一个有样式的excel
//    1、边框线 2、合并单元格 3、行高列宽 4、对齐方式 5、字体
public class POIDemo4 {

    public static void main(String[] args) throws Exception {
        Workbook workbook = new XSSFWorkbook();
        Sheet sheet = workbook.createSheet("有样式的数据");

        sheet.setColumnWidth(0,5*256);
        sheet.setColumnWidth(1,8*256);
        sheet.setColumnWidth(2,10*256);
        sheet.setColumnWidth(3,10*256);
        sheet.setColumnWidth(4,30*256);

//        需求:1、边框线:全边框  2、行高:42   3、合并单元格:第1行的第1个单元格到第5个单元格 4、对齐方式:水平垂直都要居中 5、字体:黑体18号字
        CellStyle bigTitleRowCellStyle = workbook.createCellStyle();
        bigTitleRowCellStyle.setBorderBottom(BorderStyle.THIN); //下边框  BorderStyle.THIN 细线
        bigTitleRowCellStyle.setBorderLeft(BorderStyle.THIN);  //左边框
        bigTitleRowCellStyle.setBorderRight(BorderStyle.THIN);  //右边框
        bigTitleRowCellStyle.setBorderTop(BorderStyle.THIN);  //上边框
//        对齐方式: 水平对齐  垂直对齐
        bigTitleRowCellStyle.setAlignment(HorizontalAlignment.CENTER); //水平居中对齐
        bigTitleRowCellStyle.setVerticalAlignment(VerticalAlignment.CENTER); // 垂直居中对齐
//        创建字体
        Font font = workbook.createFont();
        font.setFontName("黑体");
        font.setFontHeightInPoints((short) 18);
//        把字体放入到样式中
        bigTitleRowCellStyle.setFont(font);

        Row bigTitleRow = sheet.createRow(0);
        bigTitleRow.setHeightInPoints(42); //设置行高
        for (int i = 0; i < 5; i++) {
            Cell cell = bigTitleRow.createCell(i);
            cell.setCellStyle(bigTitleRowCellStyle);
        }
        sheet.addMergedRegion(new CellRangeAddress(0,0,0,4)); //int firstRow 起始行, int lastRow 结束行, int firstCol 开始列, int lastCol 结束列
//        向单元格中放入一句话
        sheet.getRow(0).getCell(0).setCellValue("用户信息数据");


//        小标题的样式
        CellStyle littleTitleRowCellStyle = workbook.createCellStyle();
//        样式的克隆
        littleTitleRowCellStyle.cloneStyleFrom(bigTitleRowCellStyle);
//        创建字体  宋体12号字加粗
        Font littleFont = workbook.createFont();
        littleFont.setFontName("宋体");
        littleFont.setFontHeightInPoints((short) 12);
        littleFont.setBold(true);
//        把字体放入到样式中
        littleTitleRowCellStyle.setFont(littleFont);


//        内容的样式
        CellStyle contentRowCellStyle = workbook.createCellStyle();
//        样式的克隆
        contentRowCellStyle.cloneStyleFrom(littleTitleRowCellStyle);
        contentRowCellStyle.setAlignment(HorizontalAlignment.LEFT);
//        创建字体  宋体12号字加粗
        Font contentFont = workbook.createFont();
        contentFont.setFontName("宋体");
        contentFont.setFontHeightInPoints((short) 11);
        contentFont.setBold(false);
//        把字体放入到样式中
        contentRowCellStyle.setFont(contentFont);

//        编号	姓名	手机号	入职日期	现住址

        Row titleRow = sheet.createRow(1);
        titleRow.setHeightInPoints(31.5F);
        String[] titles = new String[]{"编号","姓名","手机号","入职日期","现住址"};
        for (int i = 0; i < 5; i++) {
            Cell cell = titleRow.createCell(i);
            cell.setCellValue(titles[i]);
            cell.setCellStyle(littleTitleRowCellStyle);
        }
        String[] users = new String[]{"1","大一","13800000001","2001-03-29","北京市西城区宣武大街1号院"};
        Row row = sheet.createRow(2);
        for (int i = 0; i < 5; i++) {
            Cell cell = row.createCell(i);
            cell.setCellValue(users[i]);
            cell.setCellStyle(contentRowCellStyle);
        }

        workbook.write(new FileOutputStream("d:\\testStyle.xlsx"));
    }

}
测试百万数据的导入
package com.muziwk.test;

import org.apache.poi.xssf.usermodel.XSSFSheet;
import org.apache.poi.xssf.usermodel.XSSFWorkbook;

//测试百万数据的导入
public class POIDemo5 {

    public static void main(String[] args) throws Exception {
//        XSSFWorkbook workbook = new XSSFWorkbook("C:\\Users\\syl\\Desktop\\百万用户数据的导出.xlsx");
//        XSSFSheet sheetAt = workbook.getSheetAt(0);
//        String stringCellValue = sheetAt.getRow(0).getCell(0).getStringCellValue();
//        System.out.println(stringCellValue);
        new ExcelParse().parse("C:\\Users\\syl\\Desktop\\百万用户数据的导出.xlsx");

    }

}
ExcelParse.java
package com.muziwk.test;

import org.apache.poi.openxml4j.exceptions.InvalidFormatException;
import org.apache.poi.openxml4j.opc.OPCPackage;
import org.apache.poi.openxml4j.opc.PackageAccess;
import org.apache.poi.xssf.eventusermodel.XSSFReader;
import org.apache.poi.xssf.eventusermodel.XSSFSheetXMLHandler;
import org.apache.poi.xssf.model.SharedStringsTable;
import org.apache.poi.xssf.model.StylesTable;
import org.xml.sax.InputSource;
import org.xml.sax.XMLReader;
import org.xml.sax.helpers.XMLReaderFactory;

import java.io.InputStream;

public class ExcelParse {

	public void parse (String path) throws Exception {
		//解析器
		SheetHandler hl = new SheetHandler();
		//1.根据 Excel 获取 OPCPackage 对象
		OPCPackage pkg = OPCPackage.open(path, PackageAccess.READ);
		try {
			//2.创建 XSSFReader 对象
			XSSFReader reader = new XSSFReader(pkg);
			//3.获取 SharedStringsTable 对象
			SharedStringsTable sst = reader.getSharedStringsTable();
			//4.获取 StylesTable 对象
			StylesTable styles = reader.getStylesTable();
			XMLReader parser = XMLReaderFactory.createXMLReader();
			// 处理公共属性
			parser.setContentHandler(new XSSFSheetXMLHandler(styles,sst, hl,
					false));
			XSSFReader.SheetIterator sheets = (XSSFReader.SheetIterator)
					reader.getSheetsData();

			//逐行读取逐行解析
			while (sheets.hasNext()) {
				InputStream sheetstream = sheets.next();
				InputSource sheetSource = new InputSource(sheetstream);
				try {
					parser.parse(sheetSource);
				} finally {
					sheetstream.close();
				}
			}
		} finally {
			pkg.close();
		}
	}
}
SheetHandler.java
package com.muziwk.test;

import org.apache.poi.xssf.eventusermodel.XSSFSheetXMLHandler;
import org.apache.poi.xssf.usermodel.XSSFComment;

import com.muziwk.pojo.User;

public class SheetHandler implements XSSFSheetXMLHandler.SheetContentsHandler {

//    编号 用户名  手机号  入职日期 现住址
    private User user=null;
    @Override
    public void startRow(int rowIndex) { //每一行的开始   rowIndex代表的是每一个sheet的行索引
        if(rowIndex==0){
            user = null;
        }else{
            user = new User();
        }
    }
    @Override  //处理每一行的所有单元格
    public void cell(String cellName, String cellValue, XSSFComment comment) {

        if(user!=null){
            String letter = cellName.substring(0, 1);  //每个单元名称的首字母 A  B  C
            switch (letter){
                case "A":{
                    user.setId(Long.parseLong(cellValue));
                    break;
                }
                case "B":{
                    user.setUserName(cellValue);
                    break;
                }
            }
        }
    }
    @Override
    public void endRow(int rowIndex) { //每一行的结束
        if(rowIndex!=0){
            System.out.println(user);
        }

    }
}
1.2上传Excel
controller
    @PostMapping(value = "/uploadExcel",name = "上传用户数据")
    public void uploadExcel(MultipartFile file) throws Exception{
       userService.uploadExcel(file);
    }
serivce
	//上传用户数据
    public void uploadExcel(MultipartFile file) throws Exception {
        //有内容的workbook工作薄
        Workbook workbook = new XSSFWorkbook(file.getInputStream());
		//获取到第一个工作表
        Sheet sheet = workbook.getSheetAt(0);
        int lastRowIndex = sheet.getLastRowNum();//当前sheet的最后一行的索引值
        //读取工作表中的内容
        Row row = null;
        User user = null;
        for (int i = 1; i <= lastRowIndex; i++) {
            row = sheet.getRow(i);
			//用户名	手机号	省份	城市	工资	入职日期	出生日期	现住地址
            String userName = row.getCell(0).getStringCellValue(); //用户名
            String phone = null; //手机号
            try {
                phone = row.getCell(1).getStringCellValue();
            } catch (Exception e) {
                phone = row.getCell(1).getNumericCellValue() + "";
            }
            String province = row.getCell(2).getStringCellValue(); //省份
            String city = row.getCell(3).getStringCellValue(); //城市
            Integer salary = ((Double) row.getCell(4).getNumericCellValue()).intValue(); //工资
            Date hireDate = simpleDateFormat.parse(row.getCell(5).getStringCellValue()); //入职日期
            Date birthDay = simpleDateFormat.parse(row.getCell(6).getStringCellValue()); //出生日期
            String address = row.getCell(7).getStringCellValue(); //现住地址

            System.out.println(userName + ":" + phone + ":" + province + ":" + city + ":" + salary + ":" + hireDate + ":" + birthDay + ":" + address);

            user = new User();

            user.setUserName(userName);
            user.setPhone(phone);
            user.setProvince(province);
            user.setCity(city);
            user.setSalary(salary);
            user.setHireDate(hireDate);
            user.setBirthday(birthDay);
            user.setAddress(address);
            //执行插入user方法
            userMapper.insert(user);
        }


    }
1.3 下载Excel
controller
    @GetMapping(value = "/downLoadXlsxByPoi",name = "使用POI导出用户数据")
    public void downLoadXlsxByPoi(HttpServletResponse response) throws Exception{
       //基础导出
//        userService.downLoadXlsxByPoi(response);
        //带样式导出
//        userService.downLoadXlsxByPoiWithCellStyle(response);
        //模板导出
        userService.downLoadXlsxByPoiWithTemplate(response);
    }
service
使用POI导出用户列表数据
  //    使用POI导出用户列表数据
     public void downLoadXlsxByPoi(HttpServletResponse response) throws Exception {
         /*导出用户数据基本思路:
         1、创建一个全新的工作薄
         2、创建全新的工作表
         3、处理固定的标题  编号 姓名  手机号 入职日期 现住址
         4、从第二行开始循环遍历 向单元格中放入数据*/
 //        1、创建一个全新的工作薄
         Workbook workbook = new XSSFWorkbook("");
 //        2、创建全新的工作表
         Sheet sheet = workbook.createSheet("用户数据");
 //        设置列宽
         sheet.setColumnWidth(0, 5 * 256);  // 1代表的是一个标准字母宽度的256分之一
         sheet.setColumnWidth(1, 8 * 256);
         sheet.setColumnWidth(2, 15 * 256);
         sheet.setColumnWidth(3, 15 * 256);
         sheet.setColumnWidth(4, 30 * 256);

 //         3、处理固定的标题  编号 姓名  手机号 入职日期 现住址
         String[] titles = new String[]{"编号", "姓名", "手机号", "入职日期", "现住址"};
         Row titleRow = sheet.createRow(0);
         Cell cell = null;
         for (int i = 0; i < 5; i++) {
             cell = titleRow.createCell(i);
             cell.setCellValue(titles[i]);
         }
 //        4、从第二行开始循环遍历 向单元格中放入数据
         List<User> userList = userMapper.selectAll();
         int rowIndex = 1;
         Row row = null;
         for (User user : userList) {
             row = sheet.createRow(rowIndex);
 //            编号 姓名  手机号 入职日期 现住址
             cell = row.createCell(0);
             cell.setCellValue(user.getId());

             cell = row.createCell(1);
             cell.setCellValue(user.getUserName());

             cell = row.createCell(2);
             cell.setCellValue(user.getPhone());

             cell = row.createCell(3);
             cell.setCellValue(simpleDateFormat.format(user.getHireDate()));

             cell = row.createCell(4);
             cell.setCellValue(user.getAddress());

             rowIndex++;
         }

 //        一个流两个头
         //导出文件名称
         String filename = "员工数据.xlsx";
         //设置文件打开方式和mime类型
         response.setHeader("content-disposition", "attachment;filename=" + new String(filename.getBytes(), "ISO8859-1"));
         response.setContentType("application/vnd.openxmlformats-officedocument.spreadsheetml.sheet");
         workbook.write(response.getOutputStream());

     }
使用POI导出用户列表数据–带样式
//    使用POI导出用户列表数据--带样式
    public void downLoadXlsxByPoiWithCellStyle(HttpServletResponse response) throws Exception {
        Workbook workbook = new XSSFWorkbook();
        Sheet sheet = workbook.createSheet("有样式的数据");

        sheet.setColumnWidth(0, 5 * 256);
        sheet.setColumnWidth(1, 8 * 256);
        sheet.setColumnWidth(2, 10 * 256);
        sheet.setColumnWidth(3, 10 * 256);
        sheet.setColumnWidth(4, 30 * 256);

//        需求:1、边框线:全边框  2、行高:42   3、合并单元格:第1行的第1个单元格到第5个单元格 4、对齐方式:水平垂直都要居中 5、字体:黑体18号字
        CellStyle bigTitleRowCellStyle = workbook.createCellStyle();
        bigTitleRowCellStyle.setBorderBottom(BorderStyle.THIN); //下边框  BorderStyle.THIN 细线
        bigTitleRowCellStyle.setBorderLeft(BorderStyle.THIN);  //左边框
        bigTitleRowCellStyle.setBorderRight(BorderStyle.THIN);  //右边框
        bigTitleRowCellStyle.setBorderTop(BorderStyle.THIN);  //上边框
//        对齐方式: 水平对齐  垂直对齐
        bigTitleRowCellStyle.setAlignment(HorizontalAlignment.CENTER); //水平居中对齐
        bigTitleRowCellStyle.setVerticalAlignment(VerticalAlignment.CENTER); // 垂直居中对齐
//        创建字体
        Font font = workbook.createFont();
        font.setFontName("黑体");
        font.setFontHeightInPoints((short) 18);
//        把字体放入到样式中
        bigTitleRowCellStyle.setFont(font);

        Row bigTitleRow = sheet.createRow(0);
        bigTitleRow.setHeightInPoints(42); //设置行高
        for (int i = 0; i < 5; i++) {
            Cell cell = bigTitleRow.createCell(i);
            cell.setCellStyle(bigTitleRowCellStyle);
        }
        sheet.addMergedRegion(new CellRangeAddress(0, 0, 0, 4)); //int firstRow 起始行, int lastRow 结束行, int firstCol 开始列, int lastCol 结束列
//        向单元格中放入一句话
        sheet.getRow(0).getCell(0).setCellValue("用户信息数据");


//        小标题的样式
        CellStyle littleTitleRowCellStyle = workbook.createCellStyle();
//        样式的克隆
        littleTitleRowCellStyle.cloneStyleFrom(bigTitleRowCellStyle);
//        创建字体  宋体12号字加粗
        Font littleFont = workbook.createFont();
        littleFont.setFontName("宋体");
        littleFont.setFontHeightInPoints((short) 12);
        littleFont.setBold(true);
//        把字体放入到样式中
        littleTitleRowCellStyle.setFont(littleFont);


//        内容的样式
        CellStyle contentRowCellStyle = workbook.createCellStyle();
//        样式的克隆
        contentRowCellStyle.cloneStyleFrom(littleTitleRowCellStyle);
        contentRowCellStyle.setAlignment(HorizontalAlignment.LEFT);
//        创建字体  宋体12号字加粗
        Font contentFont = workbook.createFont();
        contentFont.setFontName("宋体");
        contentFont.setFontHeightInPoints((short) 11);
        contentFont.setBold(false);
//        把字体放入到样式中
        contentRowCellStyle.setFont(contentFont);

//        编号   姓名 手机号    入职日期   现住址

        Row titleRow = sheet.createRow(1);
        titleRow.setHeightInPoints(31.5F);
        String[] titles = new String[]{"编号", "姓名", "手机号", "入职日期", "现住址"};
        for (int i = 0; i < 5; i++) {
            Cell cell = titleRow.createCell(i);
            cell.setCellValue(titles[i]);
            cell.setCellStyle(littleTitleRowCellStyle);
        }

        List<User> userList = userMapper.selectAll();
        int rowIndex = 2;
        Row row = null;
        Cell cell = null;
        for (User user : userList) {
            row = sheet.createRow(rowIndex);
            cell = row.createCell(0);
            cell.setCellStyle(contentRowCellStyle);
            cell.setCellValue(user.getId());

            cell = row.createCell(1);
            cell.setCellStyle(contentRowCellStyle);
            cell.setCellValue(user.getUserName());

            cell = row.createCell(2);
            cell.setCellStyle(contentRowCellStyle);
            cell.setCellValue(user.getPhone());

            cell = row.createCell(3);
            cell.setCellStyle(contentRowCellStyle);
            cell.setCellValue(simpleDateFormat.format(user.getHireDate()));

            cell = row.createCell(4);
            cell.setCellStyle(contentRowCellStyle);
            cell.setCellValue(user.getAddress());

            rowIndex++;
        }

        String filename = "员工数据.xlsx";
        response.setHeader("content-disposition", "attachment;filename=" + new String(filename.getBytes(), "ISO8859-1"));
        response.setContentType("application/vnd.openxmlformats-officedocument.spreadsheetml.sheet");
        workbook.write(response.getOutputStream());

    }
利用模板导出
    public void downLoadXlsxByPoiWithTemplate(HttpServletResponse response) throws Exception {
//        1、获取到模板
        File rootFile = new File(ResourceUtils.getURL("classpath:").getPath()); //获取项目的根目录
        File templateFile = new File(rootFile, "/excel_template/userList.xlsx");
        Workbook workbook = new XSSFWorkbook(templateFile);
//       2、查询所有的用户数据
        List<User> userList = userMapper.selectAll();
//       3、放入到模板中
        Sheet sheet = workbook.getSheetAt(0);

//        获取准备好的内容单元格的样式 第2个sheet的第一行的第一个单元格中
        CellStyle contentRowCellStyle = workbook.getSheetAt(1).getRow(0).getCell(0).getCellStyle();
        int rowIndex = 2;
        Row row = null;
        Cell cell = null;
        for (User user : userList) {
            row = sheet.createRow(rowIndex);
            row.setHeightInPoints(15);

            cell = row.createCell(0);
            cell.setCellStyle(contentRowCellStyle);
            cell.setCellValue(user.getId());

            cell = row.createCell(1);
            cell.setCellStyle(contentRowCellStyle);
            cell.setCellValue(user.getUserName());

            cell = row.createCell(2);
            cell.setCellStyle(contentRowCellStyle);
            cell.setCellValue(user.getPhone());

            cell = row.createCell(3);
            cell.setCellStyle(contentRowCellStyle);
            cell.setCellValue(simpleDateFormat.format(user.getHireDate()));

            cell = row.createCell(4);
            cell.setCellStyle(contentRowCellStyle);
            cell.setCellValue(user.getAddress());
            rowIndex++;
        }
//        把第二个sheet删除
        workbook.removeSheetAt(1);

//        4、导出文件
        String filename = "员工数据.xlsx";
        response.setHeader("content-disposition", "attachment;filename=" + new String(filename.getBytes(), "ISO8859-1"));
        response.setContentType("application/vnd.openxmlformats-officedocument.spreadsheetml.sheet");
        workbook.write(response.getOutputStream());
    }
1.4下载详细信息的Excel
controller
    @GetMapping(value = "/download",name = "使用POI导出用户详细数据")
    public void downloadUserInfoByTemplate(Long id,HttpServletResponse response) throws Exception{
//        userService.downloadUserInfoByTemplate(id,response);
//        userService.downloadUserInfoByTemplate2(id,response);
      //  userService.downloadUserInfoByEasyPOI(id,response);
        userService.downloadUserInfoByPDF(id,response);
    }
service
使用模板
 //    导出用户的详细信息--使用模板
    public void downloadUserInfoByTemplate(Long id, HttpServletResponse response) throws Exception {
        //        1、获取到模板
        File rootFile = new File(ResourceUtils.getURL("classpath:").getPath()); //获取项目的根目录
        File templateFile = new File(rootFile, "/excel_template/userInfo.xlsx");
        Workbook workbook = new XSSFWorkbook(templateFile);
        Sheet sheet = workbook.getSheetAt(0);
//        2、根据ID获取某一个用户数据
        User user = userMapper.selectByPrimaryKey(id);
//        3、把用户数据放入到模板中

//        用户名  第2行第2列
        sheet.getRow(1).getCell(1).setCellValue(user.getUserName());
//        手机号  第3行第2列
        sheet.getRow(2).getCell(1).setCellValue(user.getPhone());
//        生日   第4行第2列
        sheet.getRow(3).getCell(1).setCellValue(simpleDateFormat.format(user.getBirthday()));
//        工资   第5行第2列
        sheet.getRow(4).getCell(1).setCellValue(user.getSalary());
//        入职日期  第6行第2列
        sheet.getRow(5).getCell(1).setCellValue(simpleDateFormat.format(user.getHireDate()));
//        省份   第7行第2列
        sheet.getRow(6).getCell(1).setCellValue(user.getProvince());
//        现住址  第8行第2列
        sheet.getRow(7).getCell(1).setCellValue(user.getAddress());
//        司龄  第6行第4列          使用公式稍后处理 =CONCATENATE(DATEDIF(B6,TODAY(),"Y"),"年",DATEDIF(B6,TODAY(),"YM"),"个月")
//        sheet.getRow(5).getCell(3).setCellFormula("CONCATENATE(DATEDIF(B6,TODAY(),\"Y\"),\"年\",DATEDIF(B6,TODAY(),\"YM\"),\"个月\")");
//        城市  第7行第4列
        sheet.getRow(6).getCell(3).setCellValue(user.getCity());
//        照片的位置
//        开始处理照片
//        先创建一个字节输出流
        ByteArrayOutputStream byteArrayOutputStream = new ByteArrayOutputStream();
//        读取图片 放入了一个带有缓存区的图片类中
        BufferedImage bufferedImage = ImageIO.read(new File(rootFile, user.getPhoto()));
//       把图片写入到了字节输出流中
//        user.getPhoto()
        String extName = user.getPhoto().substring(user.getPhoto().lastIndexOf(".") + 1).toUpperCase();
        ImageIO.write(bufferedImage, extName, byteArrayOutputStream);
//        Patriarch 控制图片的写入 和ClientAnchor 指定图片的位置
        Drawing patriarch = sheet.createDrawingPatriarch();
//        指定图片的位置         开始列3 开始行2   结束列4  结束行5
//        偏移的单位:是一个英式公制的单位  1厘米=360000
        ClientAnchor anchor = new XSSFClientAnchor(0, 0, 0, 0, 2, 1, 4, 5);
//        开始把图片写入到sheet指定的位置
        int format = 0;
        switch (extName) {
            case "JPG": {
                format = XSSFWorkbook.PICTURE_TYPE_JPEG;
            }
            case "JPEG": {
                format = XSSFWorkbook.PICTURE_TYPE_JPEG;
            }
            case "PNG": {
                format = XSSFWorkbook.PICTURE_TYPE_PNG;
            }
        }

        patriarch.createPicture(anchor, workbook.addPicture(byteArrayOutputStream.toByteArray(), format));
//       处理照片结束

//        4、导出文件
        String filename = "员工(" + user.getUserName() + ")详细数据.xlsx";
        response.setHeader("content-disposition", "attachment;filename=" + new String(filename.getBytes(), "ISO8859-1"));
        response.setContentType("application/vnd.openxmlformats-officedocument.spreadsheetml.sheet");
        workbook.write(response.getOutputStream());


    }
使用自定义引擎
service
public void downloadUserInfoByTemplate2(Long id, HttpServletResponse response) throws Exception {
//       1、获取模板

        File rootFile = new File(ResourceUtils.getURL("classpath:").getPath()); //获取项目的根目录
        File templateFile = new File(rootFile, "/excel_template/userInfo2.xlsx");
        Workbook workbook = new XSSFWorkbook(templateFile);
        //        2、根据ID获取某一个用户数据
        User user = userMapper.selectByPrimaryKey(id);
//        3、通过自定义的引擎放入数据
        workbook = ExcelExportEngine.writeToExcel(user, workbook, rootFile.getPath() + user.getPhoto());
//       4 导出文件
        String filename = "员工(" + user.getUserName() + ")详细数据.xlsx";
        response.setHeader("content-disposition", "attachment;filename=" + new String(filename.getBytes(), "ISO8859-1"));
        response.setContentType("application/vnd.openxmlformats-officedocument.spreadsheetml.sheet");
        workbook.write(response.getOutputStream());
    }
EntityUtils(实体类与Map互转工具类)
package com.muziwk.utils;

import java.lang.reflect.Field;
import java.text.SimpleDateFormat;
import java.util.Date;
import java.util.HashMap;
import java.util.Map;

public class EntityUtils {

  private static SimpleDateFormat sdf = new SimpleDateFormat("yyyy-MM-dd");

  /**
   * 实体类转Map
   * @param object
   * @return
   */
  public static Map<String, Object> entityToMap(Object object) {
    Map<String, Object> map = new HashMap();
    for (Field field : object.getClass().getDeclaredFields()){
      try {
        boolean flag = field.isAccessible();
        field.setAccessible(true);
        Object o = field.get(object);
//        判断o是否是日期型,如果是日期型 把值转成字符串
          if(o instanceof Date){
              o = sdf.format(o);
          }
        map.put(field.getName(), o);
        field.setAccessible(flag);
      } catch (Exception e) {
        e.printStackTrace();
      }
    }
    return map;
  }

  /**
   * Map转实体类
   * @param map 需要初始化的数据,key字段必须与实体类的成员名字一样,否则赋值为空
   * @param entity 需要转化成的实体类
   * @return
   */
  public static <T> T mapToEntity(Map<String, Object> map, Class<T> entity) {
    T t = null;
    try {
      t = entity.newInstance();
      for(Field field : entity.getDeclaredFields()) {
        if (map.containsKey(field.getName())) {
          boolean flag = field.isAccessible();
          field.setAccessible(true);
          Object object = map.get(field.getName());
          if (object!= null && field.getType().isAssignableFrom(object.getClass())) {
             field.set(t, object);
          }
          field.setAccessible(flag);
        }
      }
      return t;
    } catch (InstantiationException e) {
      // TODO Auto-generated catch block
      e.printStackTrace();
    } catch (IllegalAccessException e) {
      // TODO Auto-generated catch block
      e.printStackTrace();
    }
    return t;
  }
}
ExcelExportEngine(自定义引擎)
package com.muziwk.utils;

import org.apache.commons.lang3.StringUtils;
import org.apache.poi.ss.usermodel.*;
import org.apache.poi.xssf.usermodel.XSSFClientAnchor;
import org.apache.poi.xssf.usermodel.XSSFWorkbook;

import javax.imageio.ImageIO;
import java.awt.image.BufferedImage;
import java.io.ByteArrayOutputStream;
import java.io.File;
import java.util.Map;

public class ExcelExportEngine {

    public static Workbook writeToExcel(Object object,Workbook workbook,String imagePath) throws Exception{
//        把一个Bean转成map
        Map<String, Object> map = EntityUtils.entityToMap(object);

        Sheet sheet = workbook.getSheetAt(0);
//        循环100行,每一行循环100个单元格
        Row row = null;
        Cell cell = null;
        for (int i = 0; i < 100; i++) {
            row = sheet.getRow(i);
            if(row==null){
                break;
            }else{
                for (int j = 0; j < 100; j++) {
                    cell = row.getCell(j);
                    if(cell!=null){
                        writeToCell(cell,map);
                    }
                }

            }
        }

        if(imagePath!=null){
            //        开始处理照片
    //        先创建一个字节输出流
            ByteArrayOutputStream byteArrayOutputStream = new ByteArrayOutputStream();
    //        读取图片 放入了一个带有缓存区的图片类中
            BufferedImage bufferedImage = ImageIO.read(new File(imagePath));
    //       把图片写入到了字节输出流中
    //        user.getPhoto()
            String extName = imagePath.substring( imagePath.lastIndexOf(".")+1).toUpperCase();
            ImageIO.write(bufferedImage,extName,byteArrayOutputStream);
    //        Patriarch 控制图片的写入 和ClientAnchor 指定图片的位置
            Drawing patriarch = sheet.createDrawingPatriarch();
    //        指定图片的位置         开始列3 开始行2   结束列4  结束行5
    //        偏移的单位:是一个英式公制的单位  1厘米=360000

            Sheet sheet1 = workbook.getSheetAt(1);

            int col1 = ((Double)sheet1.getRow(0).getCell(0).getNumericCellValue()).intValue();
            int row1 = ((Double)sheet1.getRow(0).getCell(1).getNumericCellValue()).intValue();
            int col2 = ((Double)sheet1.getRow(0).getCell(2).getNumericCellValue()).intValue();
            int row2 = ((Double)sheet1.getRow(0).getCell(3).getNumericCellValue()).intValue();
            ClientAnchor anchor = new XSSFClientAnchor(0,0,0,0,col1,row1,col2,row2);
    //        开始把图片写入到sheet指定的位置
            int format = 0;
            switch (extName){
                case "JPG":{
                    format = XSSFWorkbook.PICTURE_TYPE_JPEG;
                }
                case "JPEG":{
                    format = XSSFWorkbook.PICTURE_TYPE_JPEG;
                }
                case "PNG":{
                    format = XSSFWorkbook.PICTURE_TYPE_PNG;
                }
            }

            patriarch.createPicture(anchor,workbook.addPicture(byteArrayOutputStream.toByteArray(),format));

            workbook.removeSheetAt(1);
        }

        return workbook;
    }

//    比较单元格中的值,是否和map中的key一致,如果一致向单元格中放入map这个key对应的值
    private static void writeToCell(Cell cell, Map<String, Object> map) {
        CellType cellType = cell.getCellType();
        switch (cellType){
            case FORMULA:{
                break;
            }default:{
                String cellValue = cell.getStringCellValue();
                if (StringUtils.isNotBlank(cellValue)){
                    for (String key : map.keySet()) {
                        if(key.equals(cellValue)){
                            cell.setCellValue(map.get(key).toString());
                        }
                    }
                }
            }
        }
    }

}
1.5百万数据导出
controller
@GetMapping(value = "/downLoadMillion",name = "导出百万数据")
public void downLoadMillion(HttpServletResponse response) throws Exception{
    userService.downLoadMillion(response);
}
serivce
 //    百万数据的导出 1、肯定使用高版本的excel 2、使用sax方式解析Excel(XML)
//     限制:1、不能使用模板 2、不能使用太多的样式
    public void downLoadMillion(HttpServletResponse response) throws Exception {
//        指定使用的是sax方式解析
        Workbook workbook = new SXSSFWorkbook();  //sax方式就是逐行解析
//        Workbook workbook = new XSSFWorkbook(); //dom4j的方式
//        导出500W条数据 不可能放到同一个sheet中 规定:每个sheet不能超过100W条数据
        int page = 1;
        int num = 0;// 记录了处理数据的个数
        int rowIndex = 1; //记录的是每个sheet的行索引
        Row row = null;
        Sheet sheet = null;
        while (true) {
            List<User> userList = this.findPage(page, 100000);
            if (CollectionUtils.isEmpty(userList)) {
                break; //用户数据为空 跳出循环
            }
//           0   1000000  2000000  3000000  4000000  5000000
            if (num % 1000000 == 0) {  //表示应该创建新的标题
                sheet = workbook.createSheet("第" + ((num / 1000000) + 1) + "个工作表");
                rowIndex = 1; //每个sheet中的行索引重置
//            设置小标题
//            编号   姓名 手机号    入职日期   现住址
                String[] titles = new String[]{"编号", "姓名", "手机号", "入职日期", "现住址"};
                Row titleRow = sheet.createRow(0);
                for (int i = 0; i < 5; i++) {
                    titleRow.createCell(i).setCellValue(titles[i]);
                }
            }
            for (User user : userList) {
                row = sheet.createRow(rowIndex);
                row.createCell(0).setCellValue(user.getId());
                row.createCell(1).setCellValue(user.getUserName());
                row.createCell(2).setCellValue(user.getPhone());
                row.createCell(3).setCellValue(simpleDateFormat.format(user.getHireDate()));
                row.createCell(4).setCellValue(user.getAddress());

                rowIndex++;
                num++;
            }
            page++; //当前页码加1
        }

        String filename = "百万用户数据的导出.xlsx";
        response.setHeader("content-disposition", "attachment;filename=" + new String(filename.getBytes(), "ISO8859-1"));
        response.setContentType("application/vnd.openxmlformats-officedocument.spreadsheetml.sheet");
        workbook.write(response.getOutputStream());

    }
2.导出CSV
csv的导出基本上和Excel的导出一致,大体参数也是一致
CsvExprotParams的参数描述如下
| 属性 | 类型 | 默认值 | 功能 |
|---|---|---|---|
| encoding | String | UTF8 | 文件编码 |
| spiltMark | String | , | 分隔符 |
| textMark | String | " | 字符串识别,可以去掉,需要前后一致 |
| titleRows | int | 0 | 表格头,忽略 |
| headRows | int | 1 | 标题 |
| exclusions | String[] | 0 | 忽略的字段 |
需求:改写之前使用OpenCSV导出csv文件
<dependency>
    <groupId>com.opencsv</groupId>
    <artifactId>opencsv</artifactId>
    <version>4.5</version>
</dependency>
1.1 OpenCSV导出CSV
Controller
    @GetMapping(value = "/downLoadCSV",name = "使用csv文件导出百万数据")
    public void downLoadCSV(HttpServletResponse response) throws Exception{
//        userService.downLoadCSV(response);
        userService.downLoadCSVWithEasyPOI(response);
    }
service
    //    使用csv文件导出百万数据
    public void downLoadCSV(HttpServletResponse response) throws Exception {
        ServletOutputStream outputStream = response.getOutputStream();
        String filename = "百万用户数据的导出.csv";
        response.setHeader("content-disposition", "attachment;filename=" + new String(filename.getBytes(), "ISO8859-1"));
        response.setContentType("text/csv");
        CSVWriter csvWriter = new CSVWriter(new OutputStreamWriter(outputStream, "utf-8"));
//        写入了小标题数据
        String[] titles = new String[]{"编号", "姓名", "手机号", "入职日期", "现住址"};
        csvWriter.writeNext(titles);

        int page = 1;
        while (true) {
            List<User> userList = this.findPage(page, 200000);
            if (CollectionUtils.isEmpty(userList)) {
                break;
            }
            for (User user : userList) {
                csvWriter.writeNext(new String[]{user.getId().toString(), user.getUserName(),
                        user.getPhone(), simpleDateFormat.format(user.getHireDate()), user.getAddress()});
            }
            page++;
            csvWriter.flush();
        }
        csvWriter.close();
    }
1.2 OpenCSV导入CSV
package com.muziwk.test;

import com.muziwk.pojo.User;
import com.opencsv.CSVReader;

import java.io.FileReader;
import java.text.SimpleDateFormat;
import java.time.Year;
import java.util.List;

//读取百万级数据的csv文件
public class CsvDemo {

    private static SimpleDateFormat simpleDateFormat = new SimpleDateFormat("yyyy-MM-dd");

    public static void main(String[] args) throws Exception {
        CSVReader csvReader = new CSVReader(new FileReader("d:\\百万用户数据的导出.csv"));
        String[] titles = csvReader.readNext(); //读取到第一行 是小标题
//        "编号","姓名","手机号","入职日期","现住址"
        User user = null;
        while (true){
            user = new User();
            String[] content = csvReader.readNext();
            if(content==null){
                break;
            }
            user.setId(Long.parseLong(content[0]));
            user.setUserName(content[1]);
            user.setPhone(content[2]);
            user.setHireDate(simpleDateFormat.parse(content[3]));
            user.setAddress(content[4]);
            System.out.println(user);
        }
    }
}
2.POI操作Word
1.poi操作word正文
XWPFDocumnet代表一个docx文档,其可以用来读docx文档,也可以用来写docx文档。一个文档包含多个段落,一个段落包含多个Runs文本,一个Runs包含多个Run,Run是文档的最小单元
获取所有段落:List
获取一个段落中的所有片段Runs: List
获取一个Runs中的一个Run: XWPFRun run = xwpfRuns.get(index);
2、poi操作word中的表格
一个文档包含多个表格,一个表格包含多行,一行包含多列单元格
获取所有表格:List
获取一个表格中的所有行:ListxwPFTab1eRoW> xwpfTableRows = xwpfTable.getRows();
获取一行中的所有列: List
获取一格里的内容:List
之后和正文段落一样
controller
    @GetMapping(value = "/downloadContract",name = "下载用户的合同文档")
    public void downloadContract(Long id,HttpServletResponse response) throws Exception{
       userService.downloadContract(id,response);
    }
service
    //    下载用户的合同文档
    public void downloadContract(Long id, HttpServletResponse response) throws Exception {
//        1、读取到模板
        File rootFile = new File(ResourceUtils.getURL("classpath:").getPath()); //获取项目的根目录
        File templateFile = new File(rootFile, "/word_template/contract_template.docx");
        XWPFDocument word = new XWPFDocument(new FileInputStream(templateFile));
//        2、查询当前用户User--->map
        User user = this.findById(id);
        Map<String, String> params = new HashMap<>();
        params.put("userName", user.getUserName());
        params.put("hireDate", simpleDateFormat.format(user.getHireDate()));
        params.put("address", user.getAddress());
//        3、替换数据
//         处理正文开始
        List<XWPFParagraph> paragraphs = word.getParagraphs();
        for (XWPFParagraph paragraph : paragraphs) {
            List<XWPFRun> runs = paragraph.getRuns();
            for (XWPFRun run : runs) {
                String text = run.getText(0);
                for (String key : params.keySet()) {
                    if (text.contains(key)) {
                        run.setText(text.replaceAll(key, params.get(key)), 0);
                    }
                }
            }
        }
//         处理正文结束

//      处理表格开始     名称  价值 是否需要归还 照片
        List<Resource> resourceList = user.getResourceList(); //表格中需要的数据
        XWPFTable xwpfTable = word.getTables().get(0);

        XWPFTableRow row = xwpfTable.getRow(0);
        int rowIndex = 1;
        for (Resource resource : resourceList) {
            //        添加行
//            xwpfTable.addRow(row);
            copyRow(xwpfTable, row, rowIndex);
            XWPFTableRow row1 = xwpfTable.getRow(rowIndex);
            row1.getCell(0).setText(resource.getName());
            row1.getCell(1).setText(resource.getPrice().toString());
            row1.getCell(2).setText(resource.getNeedReturn() ? "需求" : "不需要");

            File imageFile = new File(rootFile, "/static" + resource.getPhoto());
            setCellImage(row1.getCell(3), imageFile);
            rowIndex++;
        }
//     处理表格开始结束
//        4、导出word
        String filename = "员工(" + user.getUserName() + ")合同.docx";
        response.setHeader("content-disposition", "attachment;filename=" + new String(filename.getBytes(), "ISO8859-1"));
        response.setContentType("application/vnd.openxmlformats-officedocument.spreadsheetml.sheet");
        word.write(response.getOutputStream());
    }

    //    向单元格中写入图片
    private void setCellImage(XWPFTableCell cell, File imageFile) {

        XWPFRun run = cell.getParagraphs().get(0).createRun();
//        InputStream pictureData, int pictureType, String filename, int width, int height
        try (FileInputStream inputStream = new FileInputStream(imageFile)) {
            run.addPicture(inputStream, XWPFDocument.PICTURE_TYPE_JPEG, imageFile.getName(), Units.toEMU(100), Units.toEMU(50));
        } catch (Exception e) {
            e.printStackTrace();
        }

    }

    //    用于深克隆行
    private void copyRow(XWPFTable xwpfTable, XWPFTableRow sourceRow, int rowIndex) {
        XWPFTableRow targetRow = xwpfTable.insertNewTableRow(rowIndex);
        targetRow.getCtRow().setTrPr(sourceRow.getCtRow().getTrPr());
//        获取源行的单元格
        List<XWPFTableCell> cells = sourceRow.getTableCells();
        if (CollectionUtils.isEmpty(cells)) {
            return;
        }
        XWPFTableCell targetCell = null;
        for (XWPFTableCell cell : cells) {
            targetCell = targetRow.addNewTableCell();
//            附上单元格的样式
//            单元格的属性
            targetCell.getCTTc().setTcPr(cell.getCTTc().getTcPr());
            targetCell.getParagraphs().get(0).getCTP().setPPr(cell.getParagraphs().get(0).getCTP().getPPr());
        }
    }
3.EasyPOI操作Excel
<dependency>
    <groupId>cn.afterturn</groupId>
    <artifactId>easypoi-spring-boot-starter</artifactId>
    <version>4.1.3</version>
</dependency>
3.1注解介绍
官网api文档 http://doc.wupaas.com/docs/easypoi
easypoi起因就是Excel的导入导出,最初的模板是实体和Excel的对应,model–row,filed–col 这样利用注解我们可以和容易做到excel到导入导出 经过一段时间发展,现在注解有5个类分别是
- @Excel 作用到filed上面,是对Excel一列的一个描述
- @ExcelCollection 表示一个集合,主要针对一对多的导出,比如一个老师对应多个科目,科目就可以用集合表示
- @ExcelEntity 表示一个继续深入导出的实体,但他没有太多的实际意义,只是告诉系统这个对象里面同样有导出的字段
- @ExcelIgnore 和名字一样表示这个字段被忽略跳过这个导导出
- @ExcelTarget 这个是作用于最外层的对象,描述这个对象的id,以便支持一个对象可以针对不同导出做出不同处理
注解中的ID的用法 这个ID算是一个比较独特的例子,比如
@ExcelTarget("teacherEntity")
public class TeacherEntity implements java.io.Serializable {
    /** name */
    @Excel(name = "主讲老师_teacherEntity,代课老师_absent", orderNum = "1", mergeVertical = true,needMerge=true,isImportField = "true_major,true_absent")
    private String name;
这里的@ExcelTarget 表示使用teacherEntity这个对象是可以针对不同字段做不同处理 同样的ExcelEntity 和ExcelCollection 都支持这种方式 当导出这对象时,name这一列对应的是主讲老师,而不是代课老师还有很多字段都支持这种做法
@Excel
这个是必须使用的注解,如果需求简单只使用这一个注解也是可以的,涵盖了常用的Excel需求,需要大家熟悉这个功能,主要分为基础,图片处理,时间处理,合并处理几块,name_id是上面讲的id用法,这里就不累言了
| 属性 | 类型 | 默认值 | 功能 |
|---|---|---|---|
| name | String | null | 列名,支持name_id |
| needMerge | boolean | fasle | 是否需要纵向合并单元格(用于含有list中,单个的单元格,合并list创建的多个row) |
| orderNum | String | “0” | 列的排序,支持name_id |
| replace | String[] | {} | 值得替换 导出是{a_id,b_id} 导入反过来 |
| savePath | String | “upload” | 导入文件保存路径,如果是图片可以填写,默认是upload/className/ IconEntity这个类对应的就是upload/Icon/ |
| type | int | 1 | 导出类型 1 是文本 2 是图片,3 是函数,10 是数字 默认是文本 |
| width | double | 10 | 列宽 |
| height | double | 10 | 列高,后期打算统一使用@ExcelTarget的height,这个会被废弃,注意 |
| isStatistics | boolean | fasle | 自动统计数据,在追加一行统计,把所有数据都和输出 这个处理会吞没异常,请注意这一点 |
| isHyperlink | boolean | false | 超链接,如果是需要实现接口返回对象 |
| isImportField | boolean | true | 校验字段,看看这个字段是不是导入的Excel中有,如果没有说明是错误的Excel,读取失败,支持name_id |
| exportFormat | String | “” | 导出的时间格式,以这个是否为空来判断是否需要格式化日期 |
| importFormat | String | “” | 导入的时间格式,以这个是否为空来判断是否需要格式化日期 |
| format | String | “” | 时间格式,相当于同时设置了exportFormat 和 importFormat |
| databaseFormat | String | “yyyyMMddHHmmss” | 导出时间设置,如果字段是Date类型则不需要设置 数据库如果是string 类型,这个需要设置这个数据库格式,用以转换时间格式输出 |
| numFormat | String | “” | 数字格式化,参数是Pattern,使用的对象是DecimalFormat |
| imageType | int | 1 | 导出类型 1 从file读取 2 是从数据库中读取 默认是文件 同样导入也是一样的 |
| suffix | String | “” | 文字后缀,如% 90 变成90% |
| isWrap | boolean | true | 是否换行 即支持\n |
| mergeRely | int[] | {} | 合并单元格依赖关系,比如第二列合并是基于第一列 则{0}就可以了 |
| mergeVertical | boolean | fasle | 纵向合并内容相同的单元格 |
| fixedIndex | int | -1 | 对应excel的列,忽略名字 |
| isColumnHidden | boolean | false | 导出隐藏列 |
@ExcelTarget
限定一个到处实体的注解,以及一些通用设置,作用于最外面的实体
| 属性 | 类型 | 默认值 | 功能 |
|---|---|---|---|
| value | String | null | 定义ID |
| height | double | 10 | 设置行高 |
| fontSize | short | 11 | 设置文字大小 |
@ExcelEntity
标记是不是导出excel 标记为实体类,一遍是一个内部属性类,标记是否继续穿透,可以自定义内部id
| 属性 | 类型 | 默认值 | 功能 |
|---|---|---|---|
| id | String | null | 定义ID |
@ExcelCollection
一对多的集合注解,用以标记集合是否被数据以及集合的整体排序
| 属性 | 类型 | 默认值 | 功能 |
|---|---|---|---|
| id | String | null | 定义ID |
| name | String | null | 定义集合列名,支持nanm_id |
| orderNum | int | 0 | 排序,支持name_id |
| type | Class<?> | ArrayList.class | 导入时创建对象使用 |
@ExcelIgnore
忽略这个属性,多使用需循环引用中,无需多解释吧^^
@ExcelTarget
限定一个到处实体的注解,以及一些通用设置,作用于最外面的实体
| 属性 | 类型 | 默认值 | 功能 |
|---|---|---|---|
| value | String | null | 定义ID |
| height | double | 10 | 设置行高 |
| fontSize | short | 11 | 设置文字大小 |
3.2EasyPOI导出Excel
Pojo
package com.muziwk.pojo;
import cn.afterturn.easypoi.excel.annotation.Excel;
import com.fasterxml.jackson.annotation.JsonFormat;
import com.fasterxml.jackson.annotation.JsonIgnore;
import lombok.Data;
import tk.mybatis.mapper.annotation.KeySql;

import javax.persistence.Id;
import javax.persistence.Table;
import javax.persistence.Transient;
import java.util.Date;
import java.util.List;

/**
 * 员工
 */
@Data
@Table(name="tb_user")
public class User {
    @Id
    @KeySql(useGeneratedKeys = true)
    @Excel(name = "编号",orderNum = "0" ,width = 5)
    private Long id;         //主键
    @Excel(name = "姓名",orderNum = "1" ,width = 15,isImportField = "true")
    private String userName; //员工名
    @Excel(name = "手机号",orderNum = "2" ,width = 15,isImportField = "true")
    private String phone;    //手机号
    @Excel(name = "省份",orderNum = "3" ,width = 15,isImportField = "true")
    private String province; //省份名
    @Excel(name = "城市",orderNum = "4" ,width = 15,isImportField = "true")
    private String city;     //城市名
    @Excel(name = "工资",orderNum = "5" ,width = 10,type = 10,isImportField = "true")
    private Integer salary;   // 工资
    @Excel(name = "入职日期",orderNum = "6" ,width = 10,format = "yyyy-MM-dd",isImportField = "true")
    @JsonFormat(pattern="yyyy-MM-dd")
    private Date hireDate; // 入职日期

    @JsonIgnore //转json时不考虑这个字段
    @Transient //这个字段不需要和表对应
    private String hireDateStr;

    private String deptId;   //部门id
    @Excel(name = "出生日期",orderNum = "7" ,width = 10,format = "yyyy-MM-dd",isImportField = "true")
    private Date birthday; //出生日期
    @Excel(name = "照片",orderNum = "8" ,width = 10,type =2 ,isImportField = "true",savePath ="C:\\Users\\lidag\\Desktop\\report\\project\\user_management\\user_management\\src\\main\\resources\\static\\user_photos" )
    private String photo;    //一寸照片
    @Excel(name = "现住址",orderNum = "7" ,width = 20,isImportField = "true")
    private String address;  //现在居住地址

    private List<Resource> resourceList; //办公用品

    @Override
    public String toString() {
        return "User{" +
                "id=" + id +
                ", userName='" + userName + '\'' +
                ", phone='" + phone + '\'' +
                ", hireDate=" + hireDate +
                ", address='" + address + '\'' +
                '}';
    }
}
controller
@GetMapping(value = "/downLoadWithEasyPOI",name = "使用EasyPOI方式导出excel")
public void downLoadWithEasyPOI(HttpServletResponse response) throws Exception{
   userService.downLoadWithEasyPOI(response);
}
service
//    使用EasyPOI方式导出excel
public void downLoadWithEasyPOI(HttpServletResponse response) throws Exception {
    ExportParams exportParams = new ExportParams("员工信息列表", "数据", ExcelType.XSSF);
    List<User> userList = userMapper.selectAll();
    Workbook workbook = ExcelExportUtil.exportExcel(exportParams, User.class, userList);

    String filename = "用户数据的导出.xlsx";
    response.setHeader("content-disposition", "attachment;filename=" + new String(filename.getBytes(), "ISO8859-1"));
    response.setContentType("application/vnd.openxmlformats-officedocument.spreadsheetml.sheet");
    workbook.write(response.getOutputStream());
}
3.3 EasyPOI导入Excel
Excel导入时需要的参数类ImportParams常用设置说明
- 读取指定的sheet比如要读取上传的第二个sheet,那么需要把startSheetIndex=1 就可以了
- 读取几个sheet 比如说读取前2个sheet,那么 sheetNum=2 就可以了
- 读取第二个到第五个sheet 设置startSheetIndex = 1 然后sheetNum = 4
- 读取全部的sheet sheetNum设置大点就可以了
- 保存Excel设置 needVerfiy = true,默认保存的路径为upload/excelUpload/Test/yyyyMMddHHmss保存名称上传时间_五位随机数,如果自定义路径,修改saveUrl就可以了,同时saveUrl也是图片上传时保存的路径
- 判断一个Excel是否合法,ImportFields设置一下值,就是表示表头至少包含的字段,如果缺一个就是不合法的Excel不导入,
- 图片的导入,导入的配置和导出是一样的,但是需要设置保存路径,保存路径默认为upload/excelUpload可以手动修改ImportParams
controller
    @PostMapping(value = "/uploadExcel",name = "上传用户数据")
    public void uploadExcel(MultipartFile file) throws Exception{
//        userService.uploadExcel(file);
        userService.uploadExcelWithEasyPOI(file);
    }
service
public void uploadExcelWithEasyPOI(MultipartFile file) throws Exception {
    ImportParams importParams = new ImportParams();
    importParams.setNeedSave(false);
    importParams.setTitleRows(1);
    importParams.setHeadRows(1);
    List<User> userList = ExcelImportUtil.importExcel(file.getInputStream(), User.class, importParams);
    for (User user : userList) {
        user.setId(null);
        userMapper.insert(user);
    }

}
3.4 导出详细信息
controller
    @GetMapping(value = "/download",name = "使用POI导出用户详细数据")
    public void downloadUserInfoByTemplate(Long id,HttpServletResponse response) throws Exception{
      userService.downloadUserInfoByEasyPOI(id,response);
    }
service
public void downloadUserInfoByEasyPOI(Long id, HttpServletResponse response) throws Exception {
    File rootFile = new File(ResourceUtils.getURL("classpath:").getPath()); //获取项目的根目录
    File templateFile = new File(rootFile, "/excel_template/userInfo3.xlsx");
    TemplateExportParams exportParams = new TemplateExportParams(templateFile.getPath(), true);

    User user = userMapper.selectByPrimaryKey(id);
    Map<String, Object> map = EntityUtils.entityToMap(user);
    ImageEntity imageEntity = new ImageEntity();
    imageEntity.setUrl(user.getPhoto());
    imageEntity.setColspan(2); //占用多少列
    imageEntity.setRowspan(4); //占用多少行

    map.put("photo", imageEntity);
    Workbook workbook = ExcelExportUtil.exportExcel(exportParams, map);

    String filename = "用户数据.xlsx";
    response.setHeader("content-disposition", "attachment;filename=" + new String(filename.getBytes(), "ISO8859-1"));
    response.setContentType("application/vnd.openxmlformats-officedocument.spreadsheetml.sheet");
    workbook.write(response.getOutputStream());
}
4.EasyPOI导出Word
下面列举下EasyPoi支持的指令以及作用,最主要的就是各种fe的用法
- 空格分割
- 三目运算 {{test ? obj:obj2}}
- n: 表示 这个cell是数值类型 {{n:}}
- le: 代表长度{{le:()}} 在if/else 运用{{le:() > 8 ? obj1 : obj2}}
- fd: 格式化时间 {{fd:(obj;yyyy-MM-dd)}}
- fn: 格式化数字 {{fn:(obj;###.00)}}
- fe: 遍历数据,创建row
- !fe: 遍历数据不创建row
- $fe: 下移插入,把当前行,下面的行全部下移.size()行,然后插入
- #fe: 横向遍历
- v_fe: 横向遍历值
- !if: 删除当前列 {{!if:(test)}}
- 单引号表示常量值 ‘’ 比如’1’ 那么输出的就是 1
- &NULL& 空格
- &INDEX& 表示循环中的序号,自动添加
- ]] 换行符 多行遍历导出
- sum: 统计数据
- cal: 基础的±X% 计算
- dict: 字典
- i18n: 国际化
整体风格和el表达式类似,大家应该也比较熟悉
采用的写法是{{}}代表表达式,然后根据表达式里面的数据取值
关于样式问题
easypoi不会改变excel原有的样式,如果是遍历,easypoi会根据模板的那一行样式进行复制
controller
    @GetMapping(value = "/downloadContract",name = "下载用户的合同文档")
    public void downloadContract(Long id,HttpServletResponse response) throws Exception{
  userService.downloadContractByEasyPOI(id,response);
    }
service
    public void downloadContractByEasyPOI(Long id, HttpServletResponse response) throws Exception {
//        获取模板文档
        File rootFile = new File(ResourceUtils.getURL("classpath:").getPath()); //获取项目的根目录
        File templateFile = new File(rootFile, "/word_template/contract_template2.docx");
//        准备数据
        User user = this.findById(id);
        Map<String, Object> params = new HashMap<>();
        params.put("userName", user.getUserName());
        params.put("hireDate", simpleDateFormat.format(user.getHireDate()));
        params.put("address", user.getAddress());

        ImageEntity imageEntityContent = new ImageEntity();
        imageEntityContent.setUrl(rootFile.getPath() + user.getPhoto());
        imageEntityContent.setWidth(100);
        imageEntityContent.setHeight(50);
        params.put("photo", imageEntityContent);

        List<Map> resourceMapList = new ArrayList<>();
        Map<String, Object> map = null;
        for (Resource resource : user.getResourceList()) {
            map = new HashMap<>();
            map.put("name", resource.getName());
            map.put("price", resource.getPrice());
            map.put("needReturn", resource.getNeedReturn());
//            map.put("photo",resource.getPhoto()); //需要处理

            ImageEntity imageEntity = new ImageEntity();
            imageEntity.setUrl(rootFile.getPath() + "/static/" + resource.getPhoto());
            map.put("photo", imageEntity);

            resourceMapList.add(map);
        }
        params.put("resourceList", resourceMapList);

//        模板文档结合数据
        XWPFDocument word = WordExportUtil.exportWord07(templateFile.getPath(), params);

//
        String filename = "员工(" + user.getUserName() + ")合同.docx";
        response.setHeader("content-disposition", "attachment;filename=" + new String(filename.getBytes(), "ISO8859-1"));
        response.setContentType("application/vnd.openxmlformats-officedocument.spreadsheetml.sheet");
        word.write(response.getOutputStream());
    }
5.Word转PDF
jacob
使用jacob调用office的方法将Word转为PDF
-
下载jacob相关的jar包和dll文件
因为Maven仓库中没有jacob包所以需要从网上下载GitHub - JACOB https://github.com/freemansoft/jacob-project
-
将jar包放入本地仓库中
进入jar包所在的目录执行以下命令
mvn install:install-file -Dfile=jacob.jar -DgroupId=com.jacob -DartifactId=jacob -Dversion=1.20 -Dpackaging=jar -DgeneratePom=true
- 将dll文件放入jre\bin目录下
6.JasperReport
6.1asperReport介绍
JasperReport 是一个开源的Java报表引擎,它不像其他的报表工具,例如Crystal报表是基于Java的,没有自己的表达式语法。Jasper Reports有提供丰富的内容到屏幕上,到打印机,或转换成PDF,HTML,XLS,RTF,ODT,CSV,TXT和XML文件的能力。Jasper Reports是一个Java类库,需要嵌入到Java应用程序中。Jasper Report的特点如下:
- 具有灵活的报表布局;
- 可以用文字或图形显示数据;
- 开发人员可以通过多种方式提供数据;
- 可以接受来自多个数据源的数据;
- 可以生成水印(水印是这样的方式被放置在主图像的副图像);
- 可以生成子报表;
- 能够导出报表到多种格式的。
6.2 开发流程
JasperReport完全由Java编写,可以用于在各种Java应用程序,包括J2EE,Web应用程序中生成动态内容。它主要目的是辅助生成面向页面的、准备打印的文档。下面的流程图描述了一个典型的报表开发的工作流程。
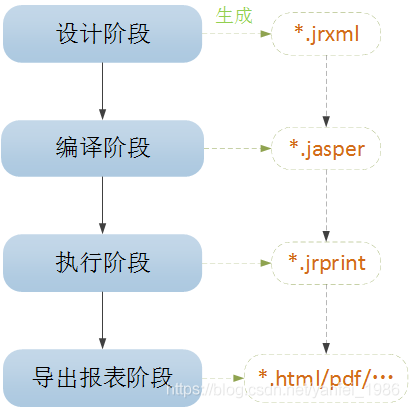
如上图所示,JasperReport报表开发分为四个阶段:
(1)设计报表
这个阶段是创建jrxml文件,该文件是包含报表布局定义的XML文档,可以使用JasperSoft Studio或iReport这两种可视化开源开发工具来创建。
(2)编译报表
这一阶段是将源文件(.jrxml)编译成二进制文件(.jasper),该jasper文件可以随应用程序运行。
(3)执行报表
该步骤是将应用程序中的数据填充在报表模板中,即jasper文件。这一阶段将会产生jasper打印文件(*.jrprint),该文件可以用来打印或导出报表。
(4)导出报表到所需要的格式中
JasperReport提供了各种形式的导出格式,如:HTML,PDF,Excel等。该阶段可以导出需要的报表格式。
6.3实现原理
JasperReport Library为报表开发提供了丰富的类库,其中生成报表并打印、导出全过程如下图所示。
开发流程如下:
(1)开发报表设计文件,也就是一个*.jrxml文件。
(2)使用JasperReports提供的JasperCompileManager工具编译*.jrxml文件,编译后生成一个*.jasper文件。
(3)使用JasperReports提供的JasperFillManager工具填充编译后的*.jasper文件,填充后生成一个*.jrprint文件。
(4)使用导出管理器JasperExportManager或者各种格式的文件导出器JRXxxExporter将*.jrprint文件导出成各种格式的报表文件。也可以使用JRViewer工具类来直接浏览报表。也可以使用打印管理器JasperPrintManager来打印报表。
6.4 相关实现类
在JasperReport的开发流程中,主要涉及下面的这几个类:
(1)net.sf.jasperreports.engine.design.JasperDesign
这个类可以在JasperReport类库内置的XML解析器对XML report design进行解析处理之后得到[2]。其对应与报表模板文件在内存中的形式,即*.jrxml文件。
(2)net.sf.jasperreports.engine.JasperReport
这个类的实例包含了一个经过编译的report design对象。生成它的时机是对报表编译之后,但尚未对其填入数据的时候。编译过程中,JasperReport需要生成一个临时的类文件,用以保存report 表达式,如变量表达式、文本、图像表达式、组表达式等等。这个临时的Java Source File是被动态编译的,编译器使用的是JDK中用来执行应用程序的编译器类(compiler class)。如果 tools.jar不在classpath中,编译过程将采用javac.exe来进行后台编译。编译后所得的字节码保存在JasperReport类中,用来在执行期填充数据和给表达式赋值。对应二进制报表文件在内存中的形式,也就是对应的*.jasper文件。
(3)net.sf.jasper.engine.JasperPrint
当一个报表已经装填好数据之后,这个文档就以JasperPrint类的实例出现。这个类可以直接用JasperReport内置的viewer进行查看,也可以序列化到硬盘以备后用,或者发送到网上去。这个类的实例是报表装填过程后的产物,它可以被JasperReport类库中的导出方法导出成各种流行的格式如PDF,HTML,XML等等。
(4)net.sf.jasperreports.engine.xml.JRLoader
装载器用于报表生成的各个主要阶段如编译,填充等。用户和引擎都可以利用这个类来装载所需的序列化对象如file、URLs、intput stream等。这个类最令人感兴趣的函数当属loadOnjectFromLocation(String location)[3]。当用户使用这个类从指定地点装载对象的时候,该函数将首先将location解释为一个合法的URL,如果解析失败,函数将认为所提供的location是硬盘上的一个文件名,并将试图读取它。如果在指定地点没找到文件,它将通过classpath定位一个相应于该location的资源,所有努力失败之后,将抛出异常。
(5)net.sf.jasperreports.engine.JasperCompileManager
这是一个与编译有关的类,利用它提供的一些编译方法,允许我们将一个报表设计文档(.jrxml文件)编译成一个二进制文件(.jasper文件)。此外,它也可以直接将net.sf.jasperreports.engine.design.JasperDesign(*.jrxml文件在内存中的形式)对象编译成net.sf.jasperreports.engine.JasperReport对象。
(6)Class net.sf.jasper.engine.JasperFillManager
这个类用来实现报表的数据填充。报表填充就是为报表的数据查询提供数据库连接,给报表的参数设置值等。填充之前是*.jasper文件,经过填充后就变成了*.jrprint文件–这是一个可显示或者可导出成报表的文件。这个类提供了很多方法来接受各种类型的report design,可以是一个对象、文件、或输入流。它的输出结果也是多样的:file、Object、output Stream。
(7)net.sf.jasperreports.engine.JasperPrintManager
用于将一个*.jrprint文件完成打印。在JapserReports中,我们可以通过这个类来打印报表,它包含了所有的打印功能。它提供了打印整个文档或者部分文档、显不显示打印对话框的方法。使用这个类可以将JasperReports文档的一页作为一个java.awt.Image对象来显示。
(8)net.sf.jasperreports.engine.JasperExportManager
这个管理类对不同来源和不同去处(文件、输入输出流等)的数据提供不同的方法。用于将可显示的报表导出成各种格式的报表文件,例如PDF、HTML、XML和其他的格式。
(9)net.sf.jasperreports.engine.export.JRXxxExporter
这是一系列的文件导出器,它们用于将*.jrprint文件导出成对应格式的报表文件。例如XSL、PDF、HTML、XML、CSV、RTF、TXT和其他的格式。JRXlsExporter、JRPdfExporter、JRXmlExporter、JRCsvExporter、JRHtmlExporter、JRTextExporter、JRRtfExporter。
(10)net.sf.jasperreports.engine.JasperRunManager
这个类可以直接将*.jasper文件导出成各种格式的报表文件,有时候在报表填充过程中我们不希望生成中间的net.sf.jasperreports.engine.JasperPrint对象,而直接生成我们所需要的文档格式,例如:PDF或HTML。
6.5 报表数据源
Jasper报表引擎获得来自数据源的数据,可以从数据库,XML文件,对象数组和集合中的对象来获得。前面我们介绍了利用JasperFillManager来实现报表的数据填充,具体是由fillReportXXX()方法获取数据源进行填充。
(1)JDBC数据源
JRResultSetDataSource类关联入一个java.sql.ResultSet对象。这是当报表数据从关系数据库中提取最常用的数据源实现。如果使用java.sql.Connection传递给引擎,它首先执行相关的查询,并将该返回java.sql.ResultSet中的对象在一个JRResultSetDataSource实例。
(2)JavaBean数据源
JRBeanArrayDataSource类和JRBeanCollectionDataSource类实现了可以分别包装的JavaBean对象的数组或集合。数组或集合中的每个对象都将被视为对这种类型的数据源中的一个记录。一个特定的JavaBean属性和相应的报表字段之间的映射是通过命名约定进行。报表字段的名称必须是相同的所指定的JavaBeans的规范JavaBean属性的名称。
(3)基于Map数据源
父级应用程序已经存储在内存中的java.util.Map对象提供填充数据的实现类JRMapArrayDataSource和JRMapCollectionDataSource非常有用。被包装的数组或集合中的每个映射对象被认为是数据源中的一个虚拟的记录,每个报表字段的值从映射中使用报表字段名作为键提取。
(4)TableModel的数据源
许多客户端应用程序的数据以表格形式显示。在许多应用中常见的需求是允许用户打印该表格形式的报告。实现类JRTableModelDataSource使生成的表格格式的Swing应用程序报告的任务。这个类封装了一个javax.swing.table.TableModel对象。列在包装的TableModel对象可以通过他们的名字或他们的基于0索引来访问。
(5)XML数据源
类JRXmlDataSource是基于DOM,它使用XPath表达式来选择XML文档数据的数据源的实现。 XML数据源中的记录是通过XPath表达式选择的节点元素表示。字段值是由每个记录使用由字段描述(JRXML
(6)CSV数据来源
JRCsvDataSource 代表了从结构化文本文件中检索其数据的数据源的实现,通常为CSV。字段值是正在使用他们的列索引检索。
(7)XLS数据来源
JRXlsDataSource 代表其检索的Excel文件的数据的数据源的实现。报表字段映射为这个数据源的实现也是基于字段列索引。
(8)空数据来源
类JREmptyDataSource,模拟与内部虚拟空的记录给定数量的数据源。它是由用户界面的工具来提供基本的报表预览功能,或在特殊报告模板,或用于测试和调试目的。
7.模板工具Jaspersoft Studio
7.1 概述
Jaspersoft Studio 是JasperReports库和JasperReports服务器的基于Eclipse的报告设计器,它可以作为Eclipse插件或作为独立的应用程序使用。Jaspersoft Studio允许您创建包含图表、图像、子报表,交叉表等复杂布局。您可以通过JDBC,TableModels,JavaBeans,XML,Hibernate,大数据(如Hive),CSV,XML/A以及自定义来源等各种来源访问数据,然后将报告发布为PDF,RTF,XML,XLS,CSV,HTML,XHTML,文本,DOCX或OpenOffice。
Jaspersoft Studio 是一个可视化的报告设计工具,使用该软件可以方便地对报表进行可视化的设计,设计结果为格式.jrxml的XML文件,并且可以把.jrxml文件编译成.jasper格式文件方便JasperReport报表引擎解析,显示。
7.2 安装配置
官网下载: https://community.jaspersoft.com/project/jaspersoft-studio/releases
第三方站点: https://sourceforge.net/projects/jasperstudio
官网需要注册账户,第三方不需要
7.3 面板介绍
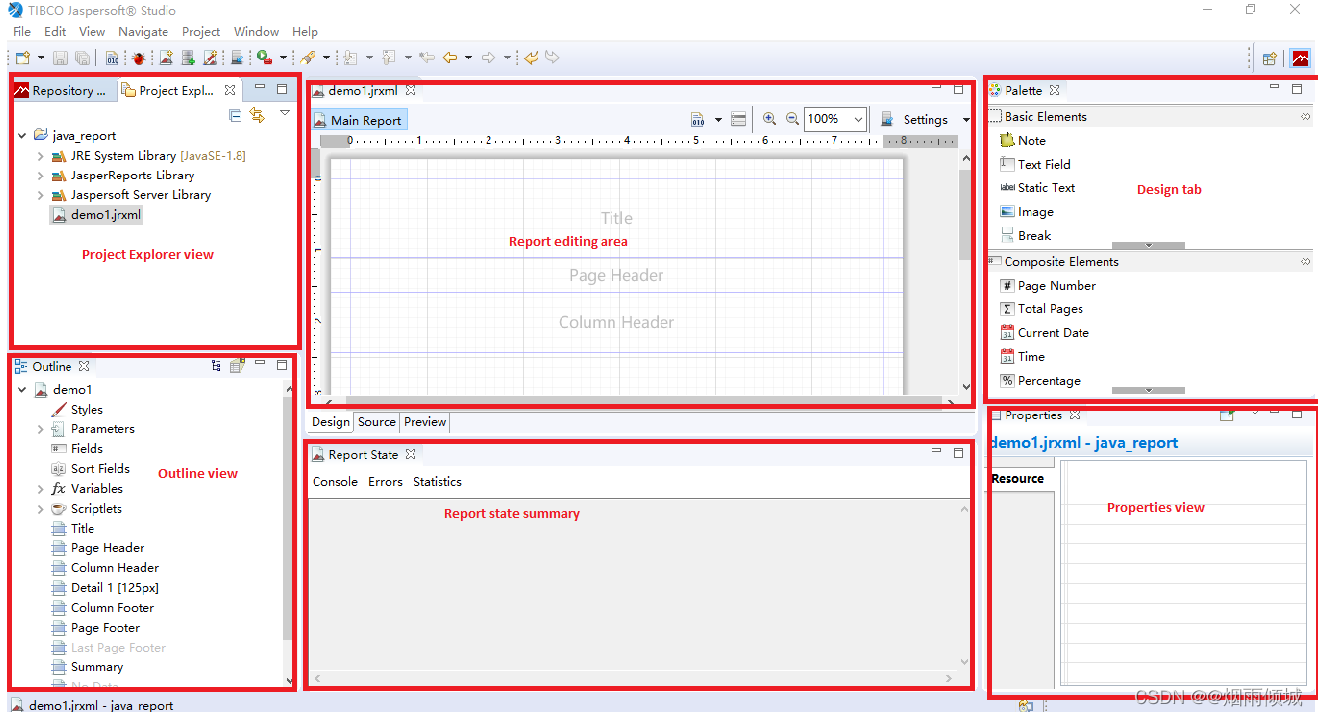
Report editing area (主编辑区域)中,您直观地通过拖动,定位,对齐和通过 Designer palette(设计器调色板)对报表元素调整大小。JasperSoft Studio 有一个多标签编辑器,Design,Source和Preview:
Design tab:当你打开一个报告文件,它允许您以图形方式创建报表选中
Source tab:包含用于报表的 JRXML 源代码。
Preview tab:允许在选择数据源和输出格式后,运行报表预览。
Repository Explorer view:包含 JasperServer 生成的连接和可用的数据适配器列表
Project Explorer view:包含JasperReports 的工程项目清单
Outline view:在大纲视图中显示了一个树的形式的方式报告的完整结构。
Properties view:通常是任何基于 Eclipse 的产品/插件的基础之一。它通常被填充与实际所选元素的属性的信息。这就是这样,当你从主设计区域(即:一个文本字段)选择一个报表元素或从大纲,视图显示了它的信息。其中一些属性可以是只读的,但大部分都是可编辑的,对其进行修改,通常会通知更改绘制的元素(如:元素的宽度或高度)。
Problems view:显示的问题和错误,例如可以阻断报告的正确的编译。
Report state summary 提供了有关在报表编译/填充/执行统计用户有用的信息。错误会显示在这里
7.3基本使用
7.3.1模板制作
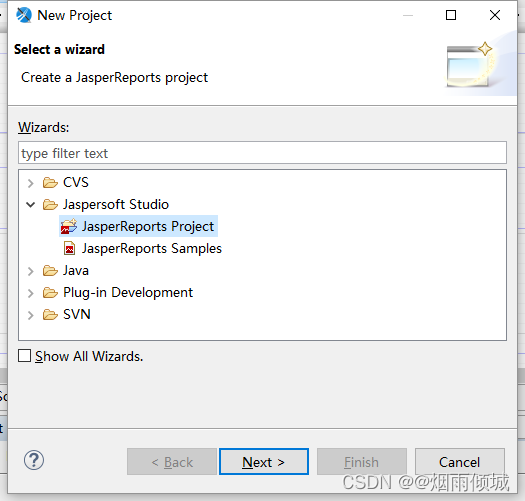
(1)打开Jaspersoft Studio ,新建一个project, 步骤: File -> New -> Project-> JasperReportsProject
(2) 新建一个Jasper Report模板,在 Stidio的左下方Project Explorer 找到刚才新建的Project (我这里新建的是DemoReport),步骤:项目右键 -> New -> Jasper Report
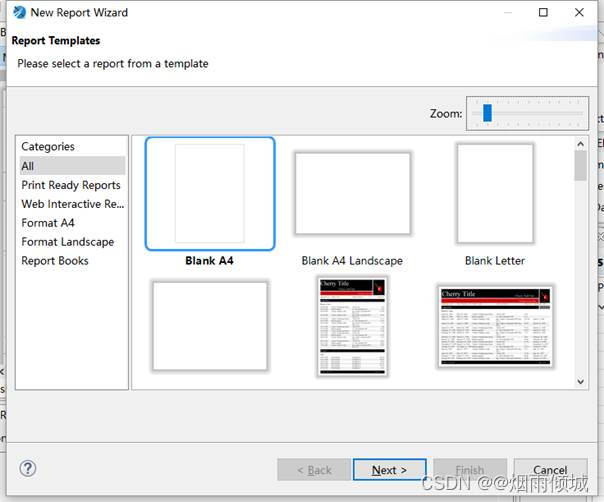
(3)选择 Blank A4 (A4纸大小的模板),然后 Next 命名为test01.jrxml.

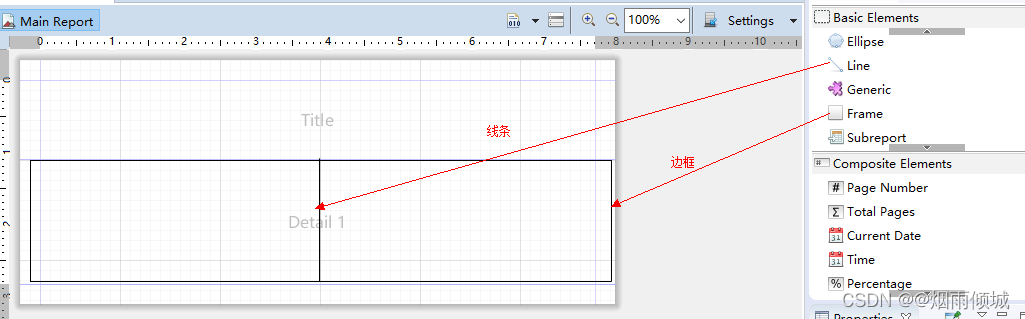
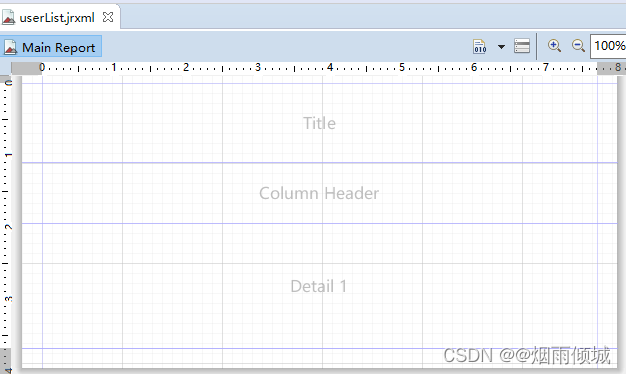
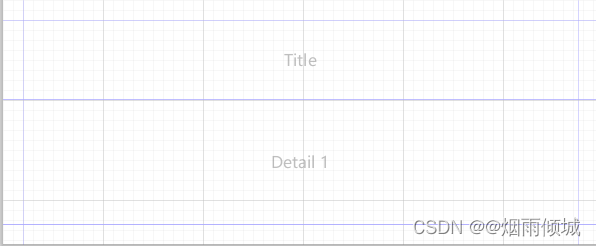
如图所示,报表模板被垂直的分层,每一个部分都是一个Band,每一个Band的特点不同:

Title(标题):只在整个报表的第一页的最上端显示。只在第一页显示,其他页面均不显示。
Page Header(页头):在整个报表中每一页都会显示。在第一页中,出现的位置在 Title Band的下面。在除了第一页的其他页面中Page Header 的内容均在页面的最上端显示。
Page Footer(页脚):在整个报表中每一页都会显示。显示在页面的最下端。一般用来显示页码。
Detail 1(详细):报表内容,每一页都会显示。
Column Header(列头):Detail中打印的是一张表的话,这Column Header就是表中列的列头。
Column Footer(列脚):Detail中打印的是一张表的话,这Column Footer就是表中列的列脚。
Summary(统计):表格的合计段,出现在整个报表的最后一页中,在Detail 1 Band后面。主要是用来做报表的合计显示。
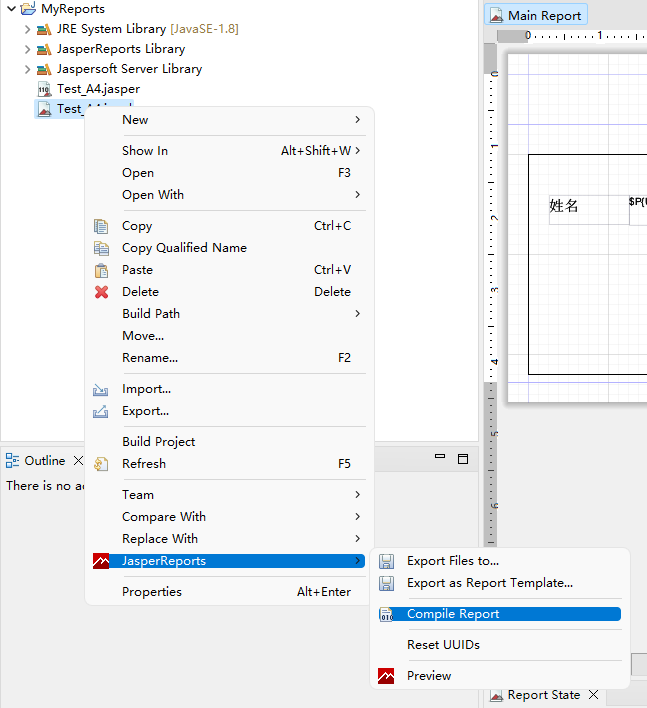
7.3.2 编译模板
右键单机模板文件 -> compile Report 对模板进行编译,生成.jasper文件
7.4 入门案例
需求

环境准备
1、导入依赖
<dependency>
    <groupId>net.sf.jasperreports</groupId>
    <artifactId>jasperreports</artifactId>
    <version>6.5.0</version>
</dependency>
<dependency>
    <groupId>org.olap4j</groupId>
    <artifactId>olap4j</artifactId>
    <version>1.2.0</version>
</dependency>
<dependency>
    <groupId>com.lowagie</groupId>
    <artifactId>itext</artifactId>
    <version>2.1.7</version>
</dependency>
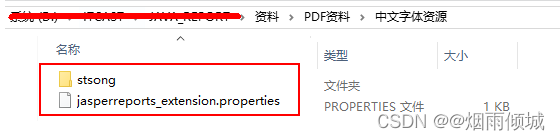
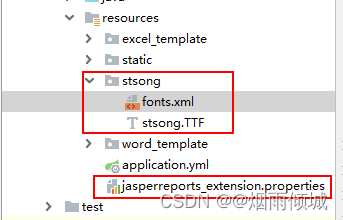
2、准备中文字体资源文件
jasperReports本身对中文的支持不够好,所以如果涉及到中文,需要自己准备中文的资源,现在已“华文宋体为例”
把图中的文件夹和properties文件直接拷贝到项目的resources文件夹下
如下效果:
导出一个最基本的PDF文件
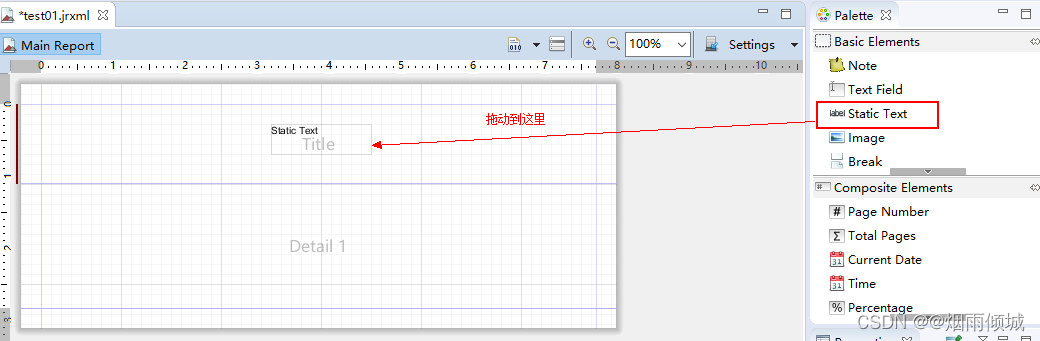
第一步:使用Jaspersoft Studio制作一个简单的模板
1、 创建新模板,删除不需要的Band

2、画边框和线
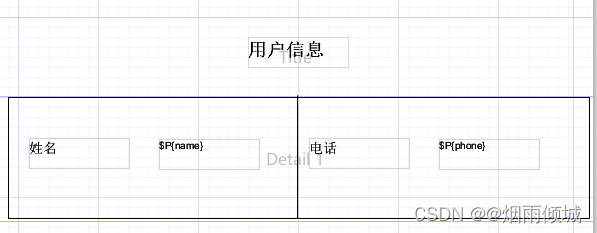
3、添加几个静态的文本
4、添加变量
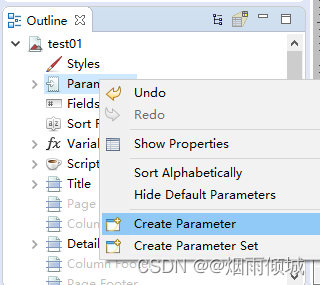
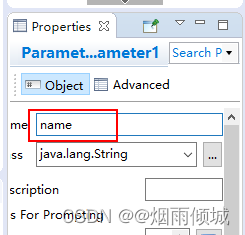
在右下角修改变量名称
5、使用变量

效果:
6、有中文的设置字体为华文宋体
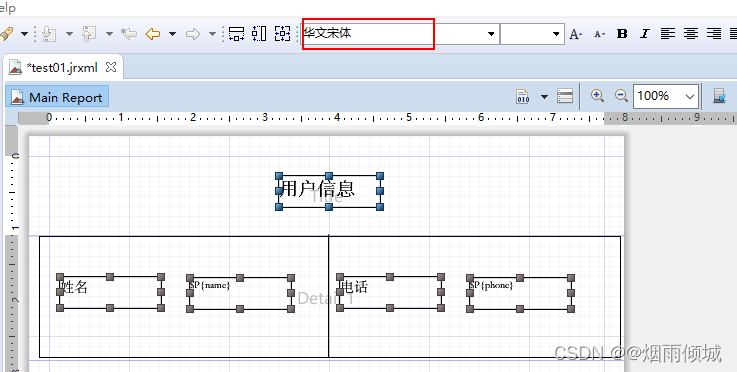
7、保存后编辑

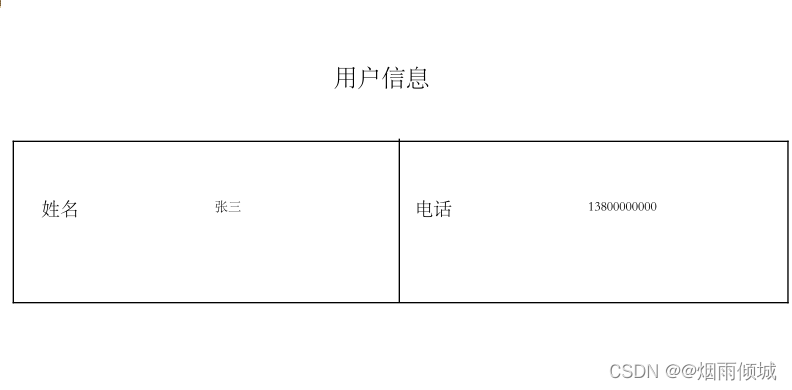
第二步:把test01.jasper文件放到磁盘的某个位置,比如我直接放到D盘下

第三步:测试代码
package com.itheima.demo;

import net.sf.jasperreports.engine.*;
import java.io.FileInputStream;
import java.io.FileOutputStream;
import java.io.InputStream;
import java.util.HashMap;
import java.util.Map;

public class PDFDemo1 {
    /**
     *  基于parameters以Map的形式填充数据
     */
    public static void main(String[] args) throws Exception {
            String filePath = "D:\\test01.jasper";
//        文件的输入流
            InputStream inputStream = new FileInputStream(filePath);
            //2.创建JasperPrint,向jasper文件中填充数据
            FileOutputStream os = new FileOutputStream("d:\\demo1.pdf");
            try {
                Map parameters = new HashMap<>();
                //设置参数 参数的key = 模板中使用的parameters参数的name
                parameters.put("name","张三");
                parameters.put("phone","13800000000");
                //3.将JasperPrint已PDF的形式输出
                JasperPrint jasperPrint = JasperFillManager.fillReport(inputStream,parameters,new JREmptyDataSource());
                //导出
                JasperExportManager.exportReportToPdfStream(jasperPrint,os);
            } catch (JRException e) {
                e.printStackTrace();
            }finally {
                os.flush();
            }
    }
}
效果:
7.5 导出用户列表
7.5.1 需求
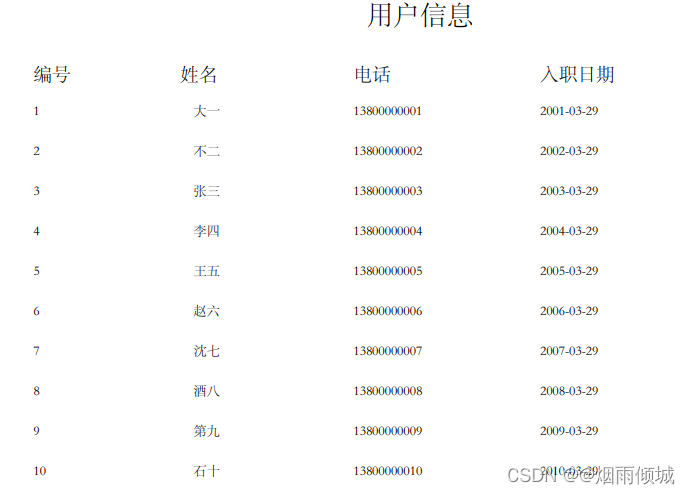
7.5.2 数据直接从数据库中获取
第一步:制作模板
1、创建新模板,删除不需要的Band

2、配置数据连接
使用JDBC数据源填充数据:使用Jaspersoft Studio 先要配置一个数据库连接
填写数据源的类型,选择“DatabaseJDBC Connection”
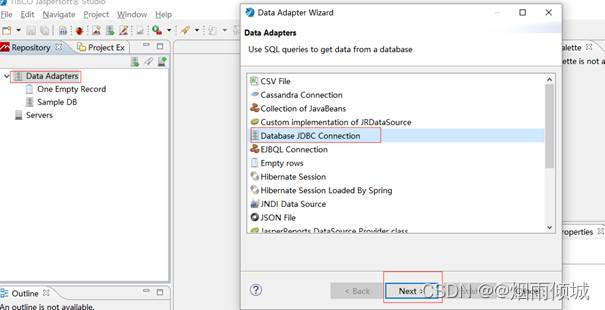
配置数据库信息
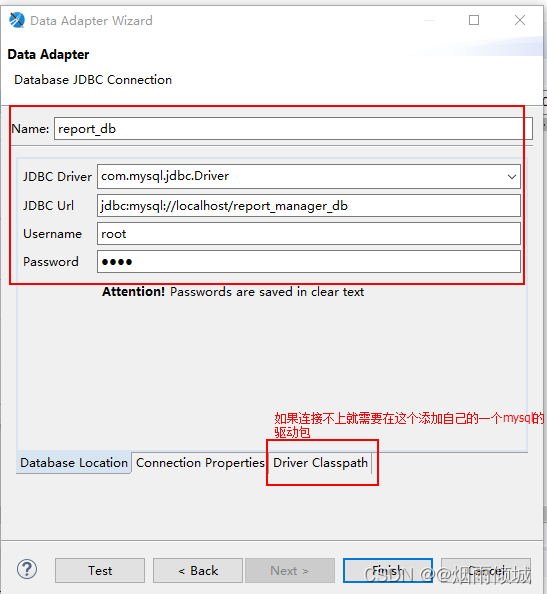
这一步,需要: (1)给创建的这个数据连接起个名字; (2)根据数据库选择驱动类型; Jaspersoft Studio 已经内置了很多常用数据库的驱动,使用的时候直接选就可以了。当然,如果这还满足不了你的话,你还可以添加你指定的 JDBC 驱动 jar 包。
3、读取表中属性
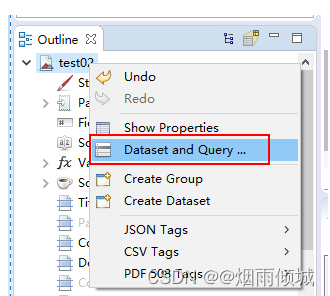
左下角右击模板名称选择 Dataset and Query
点击后:
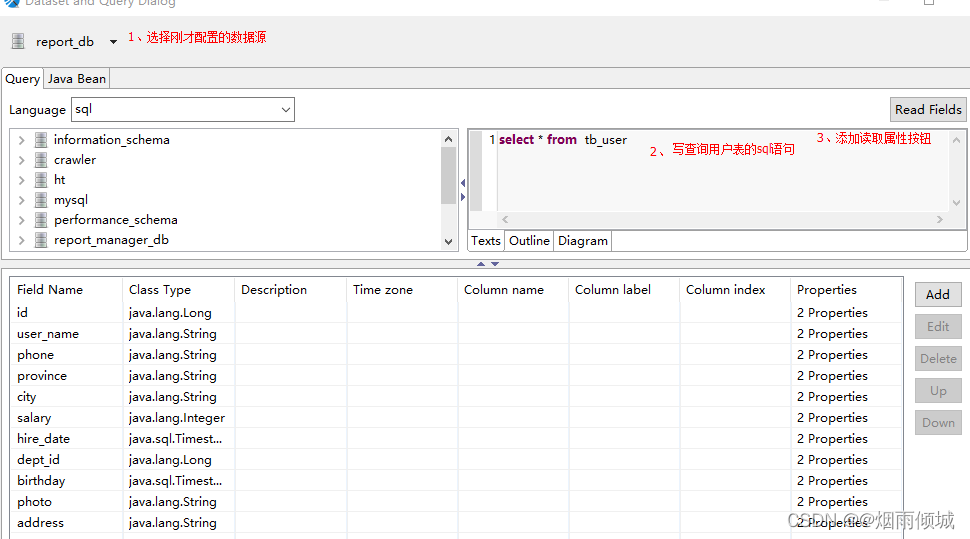
点击“OK”按钮
左下角的Fields中就有了我们想要的属性字段了
4、模板如下
修改标题,并且要使用华文宋体
第二步:把编译后的jasper文件放入到项目中

第三步:完成代码
1、Controller中添加方法
@GetMapping(value = "/downLoadPDF",name = "导出PDF")
public void  downLoadPDF(HttpServletResponse response) throws Exception{
    userService.downLoadPDFByDB(response);
}
2、Service添加方法
@Autowired
private HikariDataSource hikariDataSource;

public void downLoadPDFByDB(HttpServletResponse response) throws Exception {
    //获取模板文件
    String ctxPath = ResourceUtils.getURL("classpath:").getPath();

    String filePath =  ctxPath+"/pdf_template/userList_db.jasper";
    ServletOutputStream outputStream = response.getOutputStream();
    //文件名
    String filename="用户列表数据.pdf";
    //设置两个头 一个是文件的打开方式 一个是mime类型
    response.setHeader( "Content-Disposition", "attachment;filename="  + new String(filename.getBytes(),"ISO8859-1"));
    response.setContentType("application/pdf");
    //文件的输入流
    InputStream inputStream = new FileInputStream(filePath);
    //2.创建JasperPrint,向jasper文件中填充数据
    Map parameters = new HashMap<>();
    //3.将JasperPrint已PDF的形式输出
    JasperPrint jasperPrint = JasperFillManager.fillReport(inputStream,parameters,hikariDataSource.getConnection());
    //导出
    JasperExportManager.exportReportToPdfStream(jasperPrint,outputStream);
}
效果如下:
7.5.3 数据从后台获取
从上面效果来看,导出的日期格式有问题,其实数据库表中的数据很多情况下都需要做一些业务处理才能被使用的,所以再学习一下数据经过处理后再导出。
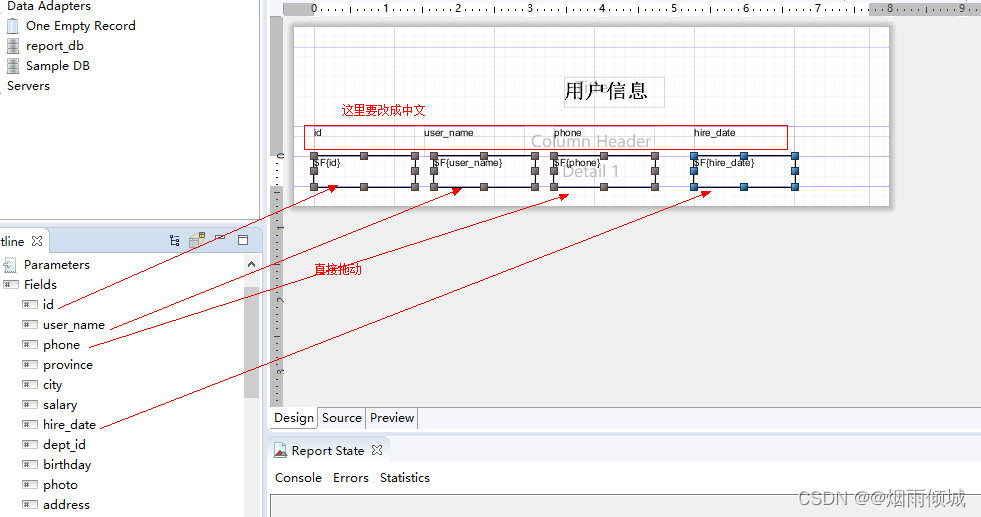
第一步:创建模板
1、创建新模板,删除不需要的Band
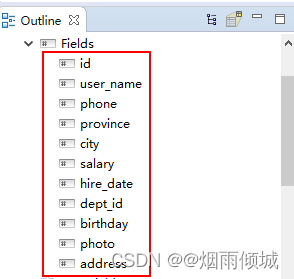
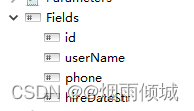
2、创建4个field
这4个field的名称要和User实体类中的属性名称要保持一致,但是注意这里有一个hireDateStr
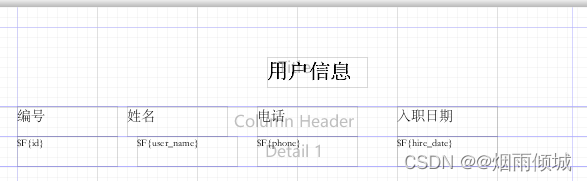
3、制作如下模板

第二步:把编译的后的模板文件放入到项目中

第三步:修改UserController中的代码
@GetMapping(value = "/downLoadPDF",name = "导出PDF")
public void  downLoadPDF(HttpServletResponse response) throws Exception{
    //userService.downLoadPDFByDB(response);
    userService.downLoadPDF(response);
}
第四步:完成UserService代码
1、在User中添加一个hireDateStr字段
@JsonIgnore //转json时不考虑这个字段
@Transient //表示非数据库字段
private String hireDateStr;
2、UserService添加方法
public void downLoadPDF(HttpServletResponse response) throws Exception {
// 获取模板文件
String ctxPath = ResourceUtils.getURL("classpath:").getPath();
String filePath = ctxPath+"/pdf_template/userList.jasper";
ServletOutputStream outputStream = response.getOutputStream();
// 文件名
String filename="用户列表数据.pdf";
// 设置两个头 一个是文件的打开方式 一个是mime类型
response.setHeader( "Content-Disposition", "attachment;filename=" + new String(filename.getBytes(),"ISO8859-1"));
response.setContentType("application/pdf");
// 文件的输入流
InputStream inputStream = new FileInputStream(filePath);
//2.创建JasperPrint,向jasper文件中填充数据
Map parameters = new HashMap<>();
// 查询所有数据
List<User> userList = userMapper.selectAll();
// 给hireDateStr赋值
userList = userList.stream().map(user -> {
user.setHireDateStr(simpleDateFormat.format(user.getHireDate()));
return user;
}).collect(Collectors.toList());
JRBeanCollectionDataSource dataSource = new JRBeanCollectionDataSource(userList);
//3.将JasperPrint已PDF的形式输出
JasperPrint jasperPrint = JasperFillManager.fillReport(inputStream,parameters,dataSource);
//导出
JasperExportManager.exportReportToPdfStream(jasperPrint,outputStream);
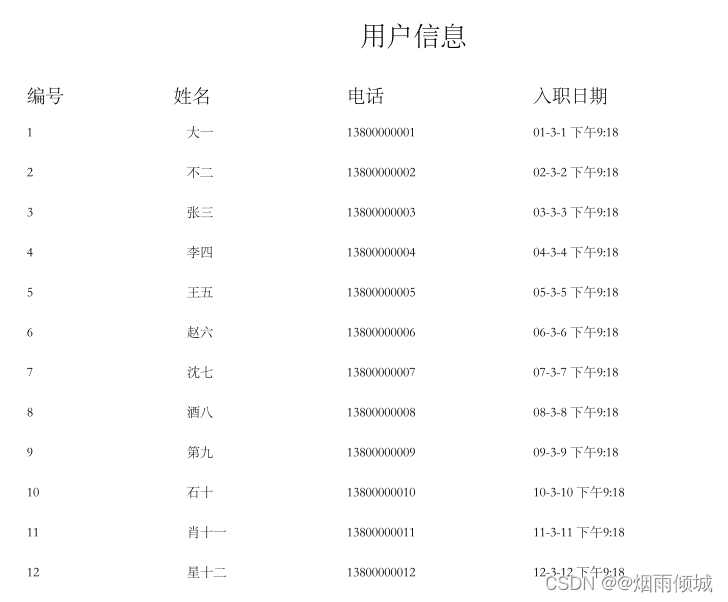
}

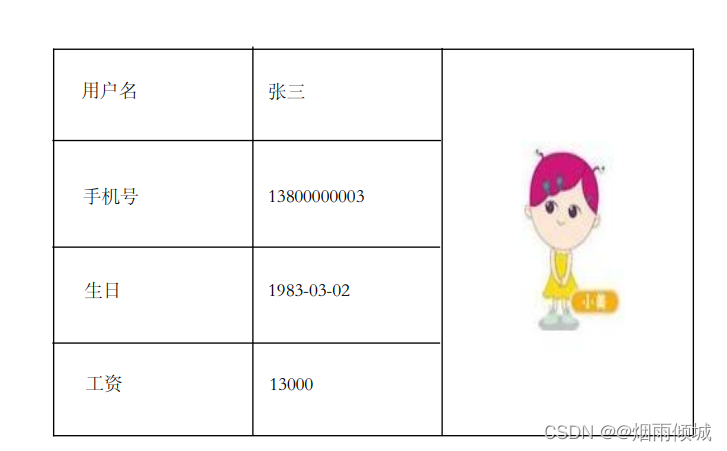
7.6 导出用户详细信息
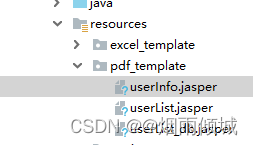
第一步:创建模板
1、创建新模板,删除不需要的Band
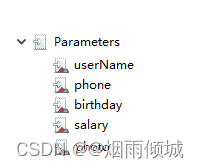
2、创建parameter
3、设置模板基本信息
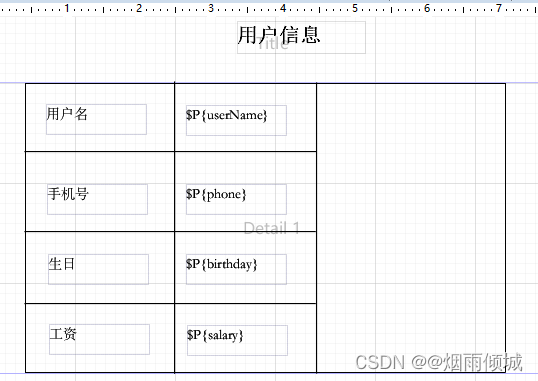
4、添加图片数据
a)、在JasperReport 拖拽image 到detail中
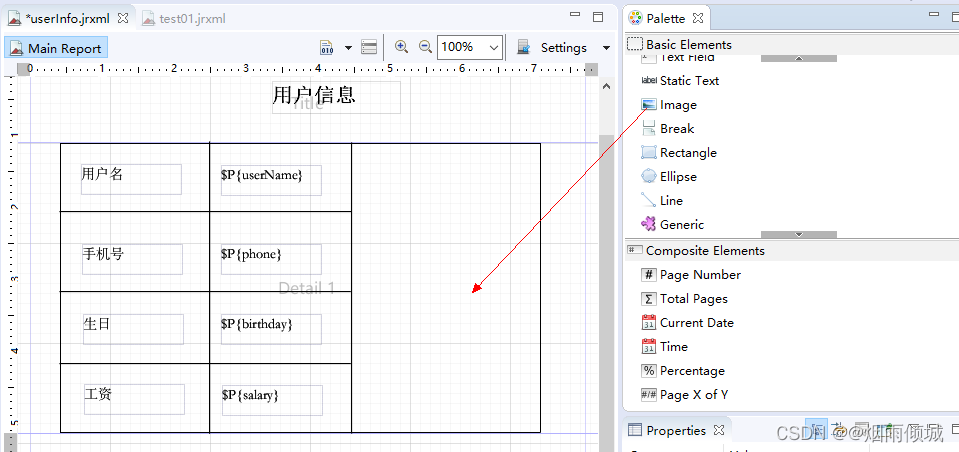
弹出 create new image element选择Image creation mode 中的最后一个No image

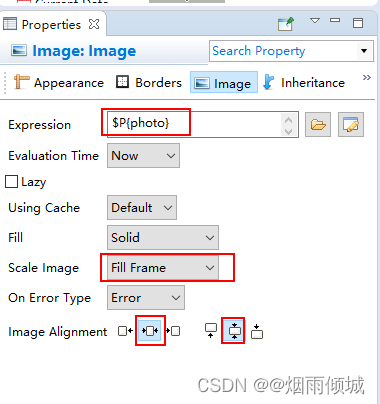
b)、选中刚才添加的image . 在右侧Properties -> Image中,Expression 设置刚才定义的photo
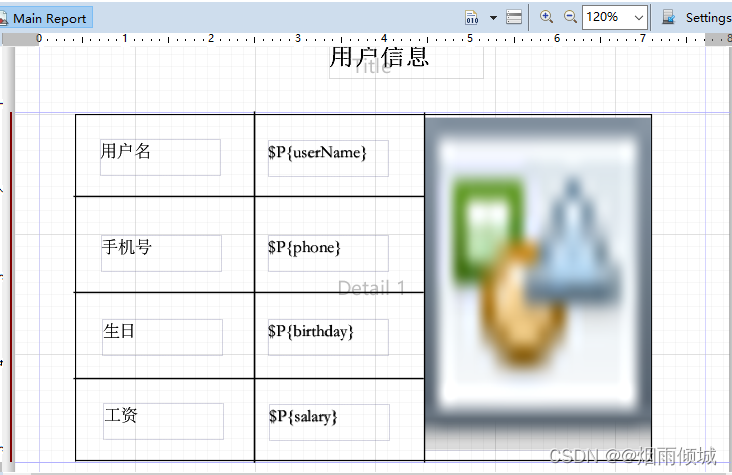
最终的模板如下:
第二步:把编译后的模板放入到项目中
第三步:代码实现
1、修改UserController中下载个人信息的方法
@GetMapping(value = "/download",name = "导出用户详细信息")
public void downLoadUserInfoWithTempalte(Long id,HttpServletRequest request,HttpServletResponse response) throws Exception{
    userService.downLoadUserInfoPDF(id,request,response);
}
2、在UserService中添加方法
public void downLoadUserInfoPDF(Long id, HttpServletRequest request, HttpServletResponse response) throws Exception{
    //        获取模板路径
    String ctxPath = ResourceUtils.getURL("classpath:").getPath();

    String filePath =  ctxPath+"/pdf_template/userInfo.jasper";
    ServletOutputStream outputStream = response.getOutputStream();
    //            文件名
    String filename="用户详细数据.pdf";
    //            设置两个头 一个是文件的打开方式 一个是mime类型
    response.setHeader( "Content-Disposition", "attachment;filename="  + new String(filename.getBytes(),"ISO8859-1"));
    response.setContentType("application/pdf");
    //        文件的输入流
    InputStream inputStream = new FileInputStream(filePath);
    //2.创建JasperPrint,向jasper文件中填充数据
    User user = userMapper.selectByPrimaryKey(id);
    Map<String, Object> parameters = EntityUtils.entityToMap(user);
    parameters.put("salary",user.getSalary().toString()); //因为模板中的salary字段是字符串
    parameters.put("photo",ctxPath+user.getPhoto());
    //3.将JasperPrint已PDF的形式输出
    JasperPrint jasperPrint = JasperFillManager.fillReport(inputStream,parameters,new JREmptyDataSource());
    //导出
    JasperExportManager.exportReportToPdfStream(jasperPrint,outputStream);
}
导出的效果:
8.IText模板导出及预览
使用Word创建一个模板
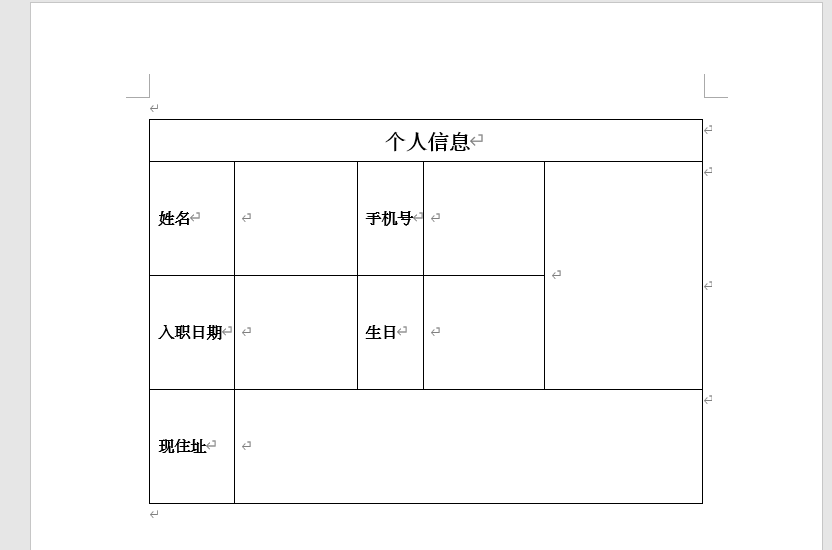
然后另存为PDF文件,使用Adobe Acrobat DC 打开,创建表单文件
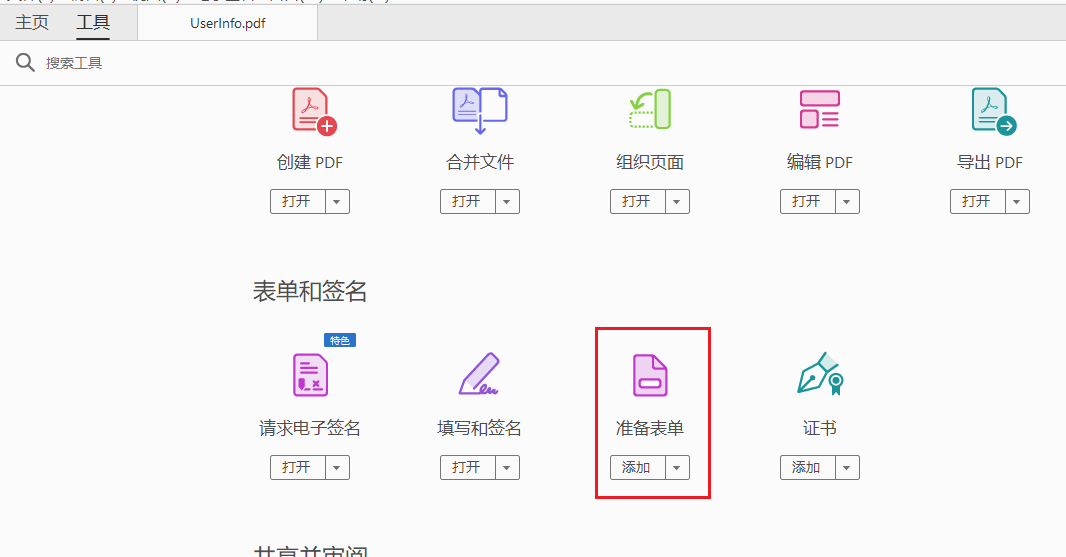
根据模板内容配置表单数据源

数据源即:你代码中实体类中对应的数据(注意字段一定要一一对应),配置完毕就可以保存进行下面的代码编写工作了。
Controller
@GetMapping(value = "/downloadByItextTemplate",name = "使用Itext模板导出用户详细数据")
public void downloadUserInfoByItextTemplate(Long id,HttpServletResponse response) throws Exception{

    userService.downloadUserInfoByItextTemplate(id,response);
}

@GetMapping(value = "/OnlineByItextTemplate",name = "使用Itext模板导出用户详细数据")
public void onlinePreviewUserInfoPdfByItextTemplate(Long id, HttpServletResponse response) throws Exception{

    userService.onlinePreviewUserInfoPdfByItextTemplate(id,response);
}
Service
public void downloadUserInfoByItextTemplate(Long id, HttpServletResponse response) throws Exception {
    // 1、获取模板文件
    File rootFile = new File(ResourceUtils.getURL("classpath:").getPath()); //获取项目的根目录
    File templateFile = new File(rootFile, "/pdf_template/UserInfo.pdf");

    PdfReader pdfReader;
    ByteArrayOutputStream bos;
    PdfStamper pdfStamper;
    OutputStream outputStream = null;

    try {
        //2、准备数据库的链接
        User user = userMapper.selectByPrimaryKey(id);
        Map<String, Object> data = new HashMap<String, Object>();
        data.put("userName", user.getUserName());
        data.put("phone", user.getPhone());
        data.put("hireDate", simpleDateFormat.format(user.getHireDate()));
        data.put("birthday", simpleDateFormat.format(user.getBirthday()));
        data.put("address", user.getAddress());
        //3.获取输出流
        outputStream = new BufferedOutputStream(response.getOutputStream());
        String filename = "用户详细数据.pdf";
        response.setContentType("application/pdf");
        response.setHeader("content-disposition", "attachment;filename=" + new String(filename.getBytes(), "iso8859-1"));

        // 2 读入pdf表单
        pdfReader = new PdfReader(ResourceUtils.getURL("classpath:").getPath()+"/pdf_template/UserInfo.pdf");
        bos = new ByteArrayOutputStream();
        // 3 根据表单生成一个新的pdf
        pdfStamper = new PdfStamper(pdfReader, bos);
        // 4 获取pdf表单
        AcroFields form = pdfStamper.getAcroFields();
        // 5给表单添加中文字体
        BaseFont baseFont = BaseFont.createFont("stsong/stsong.TTF", BaseFont.IDENTITY_H, BaseFont.NOT_EMBEDDED);
        form.addSubstitutionFont(baseFont);
        // 7遍历data 给pdf表单表格赋值
        for (String key : data.keySet()) {
            form.setField(key, data.get(key).toString());
        }
        // 8插入本地图片
        // 通过域名获取所在页和坐标,左下角为起点
        int pageno = form.getFieldPositions("photo").get(0).page;
        Rectangle signrect = form.getFieldPositions("photo").get(0).position;
        float x = signrect.getLeft();
        float y = signrect.getBottom();
        // 读图片
        Image image = Image.getInstance(ResourceUtils.getURL("classpath:").getPath()+user.getPhoto());
        // 获取操作的页面
        PdfContentByte under = pdfStamper.getOverContent(pageno);
        // 这里控制图片的大小
        image.scaleToFit(signrect.getWidth(), signrect.getHeight());
        //image.scaleToFit(100, 100);
        // 添加图片
        image.setAbsolutePosition(x, y);
        under.addImage(image);
        pdfStamper.setFormFlattening(true);
        pdfStamper.close();

        //方式一
        outputStream.write(bos.toByteArray());
        outputStream.flush();

        //方式二
        //Document doc = new Document();
        //PdfCopy copy = new PdfCopy(doc, outputStream);
        //doc.open();
        //PdfImportedPage importPage = copy.getImportedPage(new PdfReader(bos.toByteArray()), 1);
        //copy.addPage(importPage);
        //doc.close();

    } catch (IOException e) {
        throw new RuntimeException(e);
    } catch (DocumentException e) {
        throw new RuntimeException(e);
    }

}

public void onlinePreviewUserInfoPdfByItextTemplate(Long id, HttpServletResponse response) throws Exception {
    // 1、获取模板文件
    File rootFile = new File(ResourceUtils.getURL("classpath:").getPath()); //获取项目的根目录
    File templateFile = new File(rootFile, "/pdf_template/UserInfo.pdf");

    PdfReader pdfReader;
    ByteArrayOutputStream bos;
    PdfStamper pdfStamper;
    OutputStream outputStream = null;


    try {
        //2、准备数据库的链接
        User user = userMapper.selectByPrimaryKey(id);
        Map<String, Object> data = new HashMap<String, Object>();
        data.put("userName", user.getUserName());
        data.put("phone", user.getPhone());
        data.put("hireDate", simpleDateFormat.format(user.getHireDate()));
        data.put("birthday", simpleDateFormat.format(user.getBirthday()));
        data.put("address", user.getAddress());
        //3.获取输出流
        outputStream = new BufferedOutputStream(response.getOutputStream());
        //ServletOutputStream servletOutputStream = response.getOutputStream();

        // 2 读入pdf表单
        pdfReader = new PdfReader(ResourceUtils.getURL("classpath:").getPath()+"/pdf_template/UserInfo.pdf");
        bos = new ByteArrayOutputStream();
        // 3 根据表单生成一个新的pdf
        pdfStamper = new PdfStamper(pdfReader, bos);
        // 4 获取pdf表单
        AcroFields form = pdfStamper.getAcroFields();
        // 5给表单添加中文字体
        BaseFont baseFont = BaseFont.createFont("stsong/stsong.TTF", BaseFont.IDENTITY_H, BaseFont.NOT_EMBEDDED);
        form.addSubstitutionFont(baseFont);
        // 7遍历data 给pdf表单表格赋值
        for (String key : data.keySet()) {
            form.setField(key, data.get(key).toString());
        }
        // 8插入本地图片
        // 通过域名获取所在页和坐标,左下角为起点
        int pageno = form.getFieldPositions("photo").get(0).page;
        Rectangle signrect = form.getFieldPositions("photo").get(0).position;
        float x = signrect.getLeft();
        float y = signrect.getBottom();
        // 读图片
        Image image = Image.getInstance(ResourceUtils.getURL("classpath:").getPath()+user.getPhoto());
        // 获取操作的页面
        PdfContentByte under = pdfStamper.getOverContent(pageno);
        // 这里控制图片的大小
        image.scaleToFit(signrect.getWidth(), signrect.getHeight());
        //image.scaleToFit(100, 100);
        // 添加图片
        image.setAbsolutePosition(x, y);
        under.addImage(image);
        pdfStamper.setFormFlattening(true);
        pdfStamper.close();

        String filename = "用户详细数据.pdf";
        response.setContentType("application/pdf");
        response.setContentLength(bos.size());
        response.setHeader("content-disposition", "inline;filename=" + new String(filename.getBytes(), "iso8859-1"));

        outputStream.write(bos.toByteArray());
        outputStream.flush();


    } catch (IOException e) {
        throw new RuntimeException(e);
    } catch (DocumentException e) {
        throw new RuntimeException(e);
    }

}
其他案例
      @RegisterToSMP(serviceDisplay = "预览页面PDF下载")
        @RequestMapping(value = "/DM/gwclwxsq/qygl/exportPDF$m=query.service",method =RequestMethod.POST)
        public String exportPdf(@RequestBody GwclwxsqBean gwclwxsqBean , HttpServletResponse response) throws UnsupportedEncodingException {
            // 1.指定解析器
            System.setProperty("javax.xml.parsers.DocumentBuilderFactory",
                    "com.sun.org.apache.xerces.internal.jaxp.DocumentBuilderFactoryImpl");
            String filename="车辆维修审批单.pdf";
            String path="e:/";
            response.setContentType("application/pdf");
            response.setHeader("Content-Disposition", "attachment;fileName="
                    + URLEncoder.encode(filename, "UTF-8"));
            OutputStream os = null;
            PdfStamper ps = null;
            PdfReader reader = null;
            try {
                os = response.getOutputStream();
                // 2 读入pdf表单
                reader = new PdfReader(path+ "/"+filename);
                // 3 根据表单生成一个新的pdf
                ps = new PdfStamper(reader, os);
                // 4 获取pdf表单
                AcroFields form = ps.getAcroFields();
                // 5给表单添加中文字体 这里采用系统字体。不设置的话,中文可能无法显示
                BaseFont bf = BaseFont.createFont("C:/WINDOWS/Fonts/SIMSUN.TTC,1",
                              BaseFont.IDENTITY_H, BaseFont.EMBEDDED);
                form.addSubstitutionFont(bf);
                // 6查询数据================================================
                Map<String, String> data = new HashMap<String, String>();
                      data.put("commitTime", gwclwxsqBean.getCommitTime());
                      data.put("driver", gwclwxsqBean.getDriver());
                      data.put("carId", gwclwxsqBean.getCarId());
                      data.put("carType", gwclwxsqBean.getCarType());
                      data.put("repairAddress", gwclwxsqBean.getRepairAddress());
                      data.put("repairCost",gwclwxsqBean.getRepairCost());
                      data.put("project", gwclwxsqBean.getProject());
                      data.put("fwbzzxfzrYj", gwclwxsqBean.getFwbzzxfzrYj());
                      data.put("fgldspYj", gwclwxsqBean.getFgldspYj());
                      data.put("remarks", gwclwxsqBean.getRemarks());
                 // 7遍历data 给pdf表单表格赋值
                for (String key : data.keySet()) {
                    form.setField(key,data.get(key).toString());
                }
                ps.setFormFlattening(true);
                log.info("*******************PDF导出成功***********************");
            } catch (Exception e) {
          log.error("*******************PDF导出失败***********************");
                e.printStackTrace();
            } finally {
                try {
                    ps.close();
                    reader.close();
                    os.close();
                } catch (Exception e) {
                    e.printStackTrace();
                }
            }
            return null;
        }